Different Ways to Do the Same Pose
I often give different instructions for the same pose to teach my students different ways to do the same pose.
Rather than using the same instructions all the time I'll use different instructions with different intents so that my students experience a wide array of possibilities for doing the same pose.
Some techniques will be easier, some more difficult.
As an example:
- I might be focused on teaching students to lengthen their spine or to learn the feeling of bending the spine backwards. And so in each pose I'll focus on bending the spine backwards (and then relaxing it and bending it forwards.)
- Or, more recently I might be focused on teaching stability. And so using the same poses I'll be focused on teaching students to stabilize their foot, thigh and hip. (Read my ebook: Yoga Hamstring Basics for more on this.)
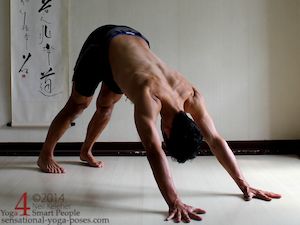
- In a similiar vein I might tell students to do downward dog with their shoulder blades retracted (closer together) and then have them try the same pose but with the shoulder blades protracted.
The intent in doing so is to ideally help my students understand that there are many different ways to do the same pose and the reason for doing a pose differently depends on what you are using the pose for. But in general what I aim to do is help my students better feel their body and control it. The idea then is that they can then find the "right way" to do a pose by feeling their body and responding to what is sensed.
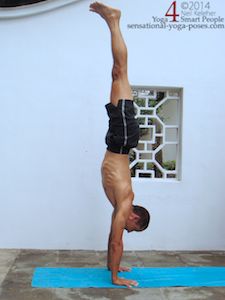
The Essence of a Handstand
As simple definition for handstand might be:
- If you can balance on your hands with your feet in the air then you can do a handstand.
We could define "a right way" as the way that makes it easy to hold handstand and doesn't harm the body and feels good and effortless, but the activations required to get there (especially when you are just learning) may differ from day to day and from practice to practice. Why? Because each day your body is in a slightly different state affected by how well you slept, what you've done, what you've ate, what you are thinking about, the environment etc.
It's like driving to work on the same route, it's the same route but every day it's going to be slightly different because patterns of traffic, pedestrians etc are going to be different. And so each day you drive the same route, you still have to pay attention. You have to see the road and what is on it and you have to respond to what is sensed so that you get to work without hitting anyone or anything.
How do you apply this to a pose like handstand?
Using Somatic Awareness
If the goal in a handstand is also to stay balanced, then you I'd suggest directing your awareness to is any part of the body that gives you sensory information that tells you when you are in balance and perhaps more importantly when you are going out of balance… before you reach the point that you are falling over.
You then respond by commanding the body to move in such a way that you move back towards balance. Then when you feel that you have reached the balance point then you respond by commanding the body to stop in that position.
Ideally the body responds immediately to your command inputs or you anticipate when you will need to begin or finish a movement so that you can give the command early enough that your body stops where required.
This is like trying to stay at the speed limit while driving. The sensory input comes from the speedometer. Responsiveness comes from using the accelerator or brakes. If the brakes are sluggish then you apply them earlier that you would with less sluggish responding brakes. And if you find you are going to slow and so accelerate to compensate, then you ease off of the accelerator just before you reach the target speed so that as acceleration reaches zero you are at the speed desired as opposed to being above it.
Learning by Limiting Options
Often with people new to yoga the problem is that they can't feel and control their body. And the body's "intelligence" hasn't enough experience to automatically operate the body effectively. And so a part of learning a new pose is also learning to feel and control the parts of the body. And so to make learning the body easy and effective it helps to focus on a limited set of actions.
As an example, you don't learn to drive by learning to use the brakes and steering and accelerator all at the same time. Instead you focus on one at a time.
In a learning environment, particularly at the very initial stages of a new pose, the ideal is to focus on learning one thing at a time.
In addition it helps if to start with the learning task is relatively simple and then increases in difficulty.
You don't first learn to drive a car by taking it on to a busy fast moving freeway. You learn in an empty car park, then you practice in streets with little or not traffic. You then gradually increase the challenges of driving to the point that you can drive on the freeway.
As an example I might be focused on teaching people to activate the serratus anterior muscle by spreading their shoulder blades. I'll have them do this with the arms in a non-weight bearing position first, and then in a semi-weight bearing position then in a full weight bearing position if that is the goal.
Now my own preference is to teach an action rather than a position. So rather than trying to maintain a "shoulder blades spread/protracted" position I'll have the students practice moving in and out of that position slowly, smoothly and rhythmically.
As an example, I might have students practice protracting then relaxing with arms down, then with arms up, then in downward dog, then have students go into a handstand (against the wall or L shaped) and do the same action.
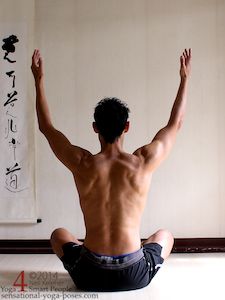
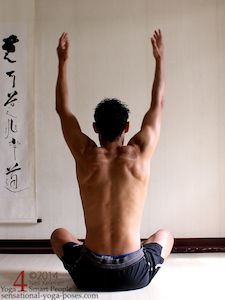
Then I have them practice lifting and lowering the shoulders, first with arms down, then with arms up , then in downward dog, then in handstand.
Lifting the shoulders (and then lowering them) with the arms lifted.
From the first picture to the second I was focusing on pulling the top of each shoulder blade upwards and inwards.
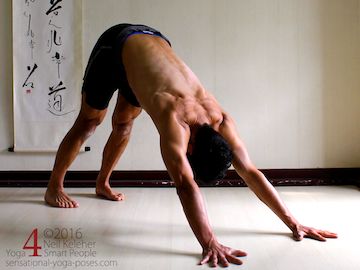
The next step would be to do the same exercise in a semi-weight bearing pose like downward dog.
From the first picture to the second my focus was on moving the tops of the shoulder blades towards the head and inwards.
(Note that my head isn't just hanging. I'm pulling it away from the ribcage so that my neck is long.
In all cases I have them try to do the action slowly, smoothly and rhythmically (no sharp starting or stopping of movements) so that they can learn to feel it both in easy non-weight bearing positions then in semi-weight bearing positions (down dog) then in full weight bearing positions (handstand or forearm stand is another possibility).
Ribcage and Neck as Foundation for the
Serratus Anterior and Trapezius Muscles
Because in the previous action moves the shoulder blade relative to the ribcage it helps if the ribcage is stable so that the muscles doing the action have a stable foundation from which to work. And so I'll often have students practice shaping the ribcage/thoracic spine as a prelude to shoulder stability exercises.
Expanding the ribcage gives the serratus anterior muscle a stable foundation from which to act on the scapulae and protract it.
Another exercise that can be used to improve both controllability and sensitivity is to lengthen the neck while lifting the chest with a particular focus on the back of the neck.
By making the back (and/or sides) of the neck feel long this then increases the distance the traps work across making it easier for them to contract and pull up on the shoulder blades.
In the upside down position they actually pull up on the body using the shoulder blades as an anchor. In either case they can be used to pull the shoulder blades in the direction of the head. (You could also think of this as pulling them away from the pelvis.)
Clearing the Accromion Process
With the arms past the ear the upper and mid fibers of the trapezius can be used to pull up on the outer edge of the shoulder blade. Meanwhile the lower trapezius could help to pull down on the inner edge of the shoulder blade so that the shoulder blade rotates in such a way that the accromion process, the bone that covers the top of the shoulder blade, moves inwards enough to clear the arm bone.
Whether the shoulders are up or down, in or out (or up and out, or up and in, or down and out, or down and in) this clearance is important in positions where the arms reach up past the head whether the arms are free (warrior 1, chair pose) or whether they are bearing weight (downward dog, handstand). And actually one rational for doing a hands wider hands stand (or downward dog) is to create more clearance between the arm bone and the accromion process. A hands narrower position could potentially increase the chances of these bones impinging.
However, if the scapulae are both supraverted so that the accromion process moves inwards relative to the bottom tip of the shoulder blade, then the upper arm bones will have clearance relative to the accromion process.
Varying Ribcage Shape and Affect on Scapular Positioning
Now lets go back to the ribcage for a second.
I mentioned earlier the importance of stabilizing the ribcage so that the muscles that position the shoulder blades have a stable foundation.
However the shape of the ribcage (and neck) can affect the positioning of the shoulder blades also.
As an example you could stand in warrior 1 with the hands reaching past the head, say shoulder width apart.
- Keeping the arms stationary, try bending the ribcage forwards while keeping it upright.
- Then bend it backwards.
These actions lift and then lower the sternum and this is the point to which the collar bones attach. The collar bones in turn attach to the shoulder blades via the accromion processes. And so bending the ribcage forwards or backwards actually affects the position of the shoulder blades relative to the ribcage and this in turn can affect the relationship between the accromion processes and the upper arms.
And so this leads to another movement you can try in handstand,
- Bending the ribcage backwards and forwards while upside down and while keeping the arms vertical.
Two other actions that focus directly on the position of the shoulder blades themselves are pulling the bottom tips of the shoulder blades outwards and pulling the accromion processes up and in. A third option is to pull down on the inner border of the shoulder blades.
- The first option can be created by activating the lower fibers of the serratus anterior, and so spreading the shoulder blades can be a good prelude to this action. Another way it can be created is by the teres major or minor muscles acting from the arm bone to pull outwards on the bottom tips of the shoulder blades.
- The second option can be caused by using the middle (and upper) fibers of the trapezius and perhaps also the clavicular portion of the sternocleidomastoid muscle.
- The third option can be caused by using the lower fibers of the trapezius.
All of these actions can be practiced in isolation first in non-weight bearing positions then in weight bearing positions with gradually more weight.
The Goal
So what's the goal of doing all of these movement exercises?
- One is to improve control,
- the other is to help you learn to feel your body. So that with enough experience you don't have to think about how to position your shoulders. You instead feel and respond in such a way that you put your shoulders in the position that feels best.
But what happens if a teacher asks you to do handstand with a particular hand/shoulder position.
Let's say you are used to pulling down on the inside edges of the shoulder blades and he or she asks you to focus on moving the outer edges upwards. Or lets say that you are used to doing it with shoulder blades protracted and he or she asks you to focus on moving the shoulder blades inwards?
Knowing that the most important point is to make sure the arms have clearance relative to the shoulder blade you can try the new alignment. More importantly, if you've learned to feel the shoulders in all of your previous exercises you should be able to find the way to make the new alignment feel good.
Balance
Note that all of the alignments talked about so far mainly dealt with supporting the body and not balancing.
For balancing in handstand I'd suggest that one of the most important actions that you can practice is moving your shoulders back and forwards relative to your hands.
This means taking the arms away from vertical (when viewed from the side.)
Standing upright our center of gravity is around the height of our pelvis, which just so happens to be the same location as the hip joints. Move the hips then we move the center at the same time.
In handstand our center is still at our hips (or closer towards the chest if doing a split handstand) but our most mobile joint that is closest to the floor is the shoulders.
I'd suggest that in handstand the shoulders give more immediate control of the center of gravity. The legs are important but controlling the legs can be more difficult because they are massive and so far away from the ground.
But rather than listening to the theory try it for yourself.
- Try moving the shoulders forwards and back.
- Rest and repeat but this time try moving the legs forwards and back, then the hips, the try moving just one leg at a time forwards and back.
Next try balancing and focus on just moving the shoulders to stay balanced.
Focus on feeling your hands. If you feel your weight move forwards then move your shoulders back to compensate. If you feel your weight move back then move your shoulders forward to compensate.
(While the hands are a key to feeling balance, if you can feel your whole body and notice immediately when it is moving forwards or backwards, you can take steps to compensate sooner. The sooner you feel changes, the faster you respond (without over shooting) the easier it is to stay balanced).
Take a rest, then try moving your legs forwards and back to compensate. Then try moving your pelvis. Then try moving just your right leg and then just your left. Try these options so that you can use whichever one is best, or so that you can use any of them when you need to (or some combination of any of them.)
Published: 2014 10 16
