Combining spinal movements with SI joint movements
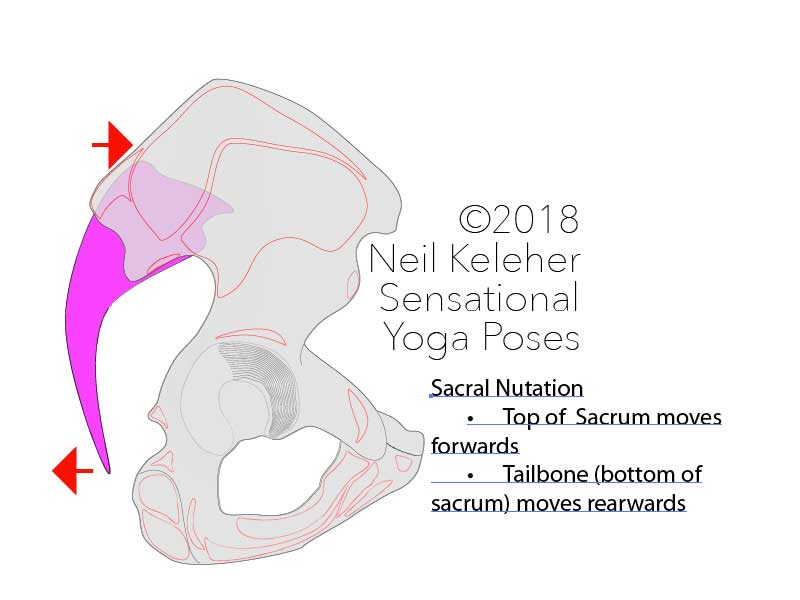
One assumption with the SI joints is that when the spine is bent back the SI joints tend to nutate. The sitting bones move out and the ASICs move inwards.
When the spine is bent forwards, the SI joints tend to counter-nutate. The sitting bones move in and the ASICs move outwards.
For a backbend like bridge pose, (or wheel pose) where both the spine and the hips bend back (and other poses where both the hips and spine are bent back), one possible problem is that with the SI joints nutated, the sitting bones are widened. And thus they may restrict rearward movement of the femurs.
For a forward bend, assuming that we have to at some point bend the spine forwards as well as the hips, we get the opposite problem. With the si joints counter-nutated, then the ASICs are widened and now they potentially inhibit forward movement of the femurs.
The question then can be, should the SI joints be adjusted to suit the spine or the hip bones? Going back to the backbend for the hips and spine, we might be assuming that the SI joints should be nutated, to match the spinal back bend. But what if we counter-nutate them to better facilitate the back bend at the hips. Looking at the forward bend, we might assume the SI joints would be counter-nutated, to match the spinal forward bend. But what if we nutate instead to facilitate the forward bend at the hips.
Why SI joint movement is important for Guys and Girls
Before going on it's worth mentioning that SI joint movement tends to be very limited in guys and it often tends to be talked about in the context of pregnancy.
I'll suggest here that SI joint control can be important for both guys and girls because it can affect (and be affected by) both the knee joint and the hip joint.
One reason for this is that there are a set of muscles muscles that attach to the four corner points of the hip bone. These muscles all run from the corner points of the hip bones across the hip and knee joint to attach to the outside and inside of the lower leg bones.
SI joint control (or lack of control) can affect these muscles and thus the knee.
In addition, since one half of each si joint is made up of the hip bone, SI joint control (or it's lack) can affect the hip joint.
In both cases the opposite is also true. The SI joint can be affected by the knee joint. It can also be affected by the hip joint.
Transmitting tension from the knees to the spine
One simple way to think of the SI joint is as a switch that controls the transmission of tension from the knees and hips to the spine and vice versa. The better the SI joints work, the better your legs and spine can work together.
The SI joints allow the hip bones to move relative to the spine
The SI joints, which attach the hip bones to the sacrum, not only allow the hip bones to move relative to the sacrum, they allow the hip bones to move relative to the spine as a whole.
If we consider the SI joints as allowing the hip bones to move relative to the spine as a whole, we can reason that the purpose of these joints is to allow for optimum positioning of the hip bones relative to the femurs in the same way that movements of the scapular relative to the ribcage allows for optimum positioning relative to the humerus (the upper arm bone).
These movements of the scapula relative to the ribcage can occur despite however the ribcage is currently configured.
So for example, we can bend the ribcage forwards, backwards and we can twist it. And for all of these configurations, we can still adjust the position of the scapulae relative to the ribcage. This isn't to say that the movements of the scapulae are unaffected by ribcage configuration. It is to say that the scapulae can continue to move despite any configuration of the ribcage.
The same may be true with the SI joints and the hip bones. No matter how the sacrum and lumbar spine (and the rest of the spine) are configured i.e. bent forwards, backwards, twisting (however slight) or side bending, we can always still move the hip bones relative to the lumbar spine and sacrum via the SI joints.
How spinal posture affects hip bone positioning via the SI joints
As with the ribcage and shoulder blades, the configuration of the spine, particular the lumbar spine and sacrum, will affect the position and how we control the hip bones but the hip bones will still be controllable. At least that is the assumption for this article.
Previously the general tendency may be to suggest that when the spine is bent backwards the SI joints tend to nutate while when the spine is bent forwards the SI joints tend to counter-nutate.
The idea here is that the SI joints can nutate and counter-nutate whether the spine is bent forwards or backwards.
- If the spine is bent backwards, the SI joints can move between nutation and counter nutation.
- If the spine is bent forwards, the SI joints can move between nutation and counter-nutation.
In either case, nutation and counter-nutation of the SI joints will have some affect on the spine, particularly on the sacrum and lower lumbar vertebrae,
Preventing hip impingement
When positioning the scapulae for particular arm movements, one idea is that we position it to prevent impingement. For example,with arms overhead, we can rotate the accromion processes (a ridge of bone just above the shoulder socket) inwards. They thus move out of the way of the upper arm bones as the arm bones are lifted. In addition, this inwards movement helps to anchor the muscles that attach there meaning they can act more effectively on the arm bones.
With the hip bones, we could first look at positioning them from the view point of preventing impingement.
So for a back bend at the hips we can move the sitting bones inwards so that the femurs have room to extend backwards. At the same time the ASICs move inwards. This could also help to anchor muscles that are being used to move the leg backwards.
For a forward bend at the hips we can move the ASICs inwards. Then the femurs have room to flex forwards at the hips. In this case the sitting bones move outwards. This can again help to anchor muscles being used.
Muscle anchoring
Since movements at the SI joints do tend to be slight, I'll suggest that in terms of SI joint movements it can be more helpful to look at muscle anchoring versus averting the risk of impingement. This also makes it easier to justify the idea that the hip bones can nutate or counter nutate whether the spine is bent forwards or backwards.
Why sequencing is important
Note that in general when teaching new movements or complex movements, I tend to sequence the movements. For example, with a back bend that affects both the spine and the hips, I may have the students back bend the spine first and then back bend at the hips. Or with a forward bend I may have them forward bend at the hips first and then the spine.
The important point isn't so much the order of actions, but the fact that they are sequenced. That means if it is easier to do one movement first and then an other, that's the sequencing that we use. Once that becomes easy, an option is to then try alternate sequencing.
Adjusting tension
With the SI joints and combining movements of the spine and the hips (say a back bend), one possible "sensible" approach is to bend the spine backwards first. And then bend back at the hips.
The spinal back bend may cause the hip bones to nutate. However, as we bend back at the hips we can then counter-nutate the hip bones.
In terms of the sitting bones, we gradually retract them or pull them inwards.
Note the word gradually. Gradually bending the hips back we can gradually retract the sitting bones.
The idea here is that at any moment we retract the amount necessary.
We do that by learning to feel and control the hip bones and the muscles that act on them. If we can them, we can then adjust the requisite amount.
Just as valid is to bend back at the hips first, retracting the sitting bones as we do so, and then bend back at the spine.
As an example, doing a standing back bend, we could bend the spine backwards first. Then, maintaining the back bend, tilt the spine as a whole rearwards.
Another approach is to bend back at the hips first, and then from there bend the spine back.
Adjusting the spine, then the hips
Working towards a pose like bridge pose, we could set up the spine first, bending it backwards. Then, as we lift the hips higher we can work at bending at the hips, retracting the sitting bones as we do so.
I mentioned earlier that we can do all of this by feel if we learn to feel our hip bones, si joints and the muscles that act on them. Writing this article, I am going in part based on my own experience but in part on what I think is going on. But, whenever I am actually using my body, while I might start of with a theory, it is the actual feeling in my body that I go by.
Exploring your body
So what this article offers is a starting point for exploring your body. Going back to the back bend, you can start of by bending your spine backwards. From there you can experiment by retracting your sitting bones and noticing how it feels. Rather than holding the retraction, repeat it by relaxing and then retracting slowly and smoothly. This will give you some experience in controlling your si joints and feeling them via your hip bones. You may find that this simple repetition gets you deeper into the back bend. Or you may find that you get deeper when you retract your sitting bones. Or you may find that you go deeper when you protract them.
And what this can emphasize is the idea that with the SI Joints, what may be more important is how different configurations of the SI joints (nutated, counter-nutated) anchor the hip muscles in different ways. And what this can mean is that in a back bend at the hips and spine, both nutation and counter nutation are possible but with each the leg muscles will be working slightly differently.
Extreme back bends
That being said, the deeper and the more extreme the back bend at both the hips and the spine, the less options we have. I'll suggest here that with the spine and hips working towards a maximum back-bend it may be better to counter-nutate the hip bones so that the sitting bones move inwards.
In terms of muscle anchoring, how does this affect the hip muscles?
Because counter nutation pulls the sitting bones inwards it also pulls the ASICs outwards. that means that any muscles that act from the inner edge of the ASICs, are anchored. One such muscle is the sartorius. Another may be the iliacus.
Retaining control in extreme positions
In a back bend at the hips, and assuming the knees are reasonably unbent, the sartorius will tend to be lengthened. Anchored by an outward pull on the ASIC it can act to resist hip extension.
You might think that in a back bend that is a bad thing.
What I'll suggest is in a reasonably static pose, or in a pose where we are gradually moving deeper, activating opposing muscles is helpful. It gives the working muscles more force to work against. Thus the hip extensors can exert with greater force.
Supporting a joint with balanced tension on opposite sides
With respect to the joints, opposing muscle activation means the joint is supported on both sides. For the joint capsule, this means that it is tensioned on opposite sides, meaning that its lubricating fluid is compressed meaning it can do its job and keep the joint lubricated even as it is subjected to compression.
This mechanism is quite elegant because it means that the greater the joint is compressed by its own muscles, the more it's joint capsule resists lubricating fluid being squeezed out from between articulating surfaces.
So, the sartorius as a hip flexor resists hip flexion.
With the feet on the floor, the sartorius acts to internally rotate the hip and internally rotates the lower leg bones at the knee. With the foot free and acting on the leg, it externally rotates the hip.
Anchoring the knees from below
Looking at the knee joint, the sartorius acts to internally rotate the shin which means that the external shin rotators are anchored from below. Now we have anchoring for the it band muscles such as the tensor fascia latae and superficial gluteus maximus.
Note that the activation of these muscles can be affected by foot and knee positioning. But, it can also be affected by thigh muscle activation. Activation of the IT band muscles may be facilitated by activating the vastus lateralis, the outer thigh muscle. Meanwhile activation of the sartorius can be facilitated or accentuated by activation of the vastus medialis and/or adductor muscles.
The idea here is that activation of the underlying muscles, the outer/inner vastus muscles and or the adductors can push out against the overlaying muscles (I'll consider the IT band as an extension of the tensor fascia latae and superficial gluteus maximus muscles) making it easier for those muscles to activate effectively.
Break it down to Learn it
This is a lot of information to take in all at once and so a "sensible" approach is to focus on one aspect at a time. Basically, break it down. and that's one of the nice things about "Muscle control".
It makes it easy to do just that. In the process we not only learn to control particular muscles, we also learn to feel them. The result is the ability to feel and control the body as a whole, without having to think about how to do it. And that can be carried into any activity.
Bending the spine first
Working at bending the spine back first, we can activate the spinal erectors. We can the work at bending along the entire length of the spine, from the sacrum up, or from the base of the skull down. From there we can then work to nutate the SI joints by drawing the sitting bones inwards. The hip bones will then hinge and at the same time rotate, tilting slightly forwards relative to the sacrum. This is as opposed to the sacrum tilting rearwards relative to the hip bones.
We could do something similiar in a forward bend. Bend forwards at the spine. Then from there, counter-nutate the si joints by widening the sitting bones so that the hip bones tilt rearwards relative to the sacrum.
We can vary the degree of nutation or counter-nutation
Note that nutation and counter nutation isn't simply a on-off affair. There are degrees of both, and once you get the hang of either the suggestion is to work at varying the amount of either.
Published: 2022 02 25


