Pigeon Yoga Hip Stretch
Adding Weight to the Stretch and Gradually Going Deeper
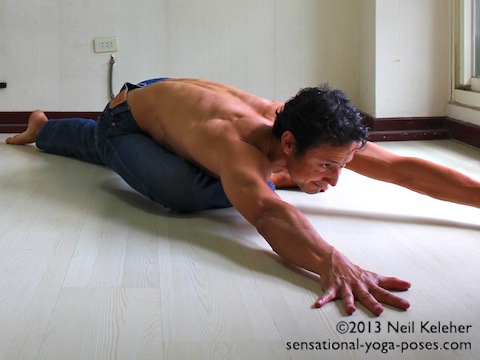
As the name suggests, pigeon yoga hip stretch is a stretch for the hips. More specifically it stretches the glutes of the front leg. (If done with the torso upright, it also stretches the hip flexors of the back leg.)
- One leg is forwards with the knee bent and shin on the floor.
Position the knee so that when viewed from the front it is slightly wider to the side than the hip.
- The other foot reaches straight back.
Viewed from the front try to position this foot so that it is directly behind the hip.
Lift the Back Leg Hip
In this version of pigeon yoga hip stretch, rather than resting the front-leg-hip on the floor, lift it so that the pelvis is level from left to right.
At the same time keep your back knee pointing down.
(To lift the front leg hip use the muscles of that leg to press your front knee down.)
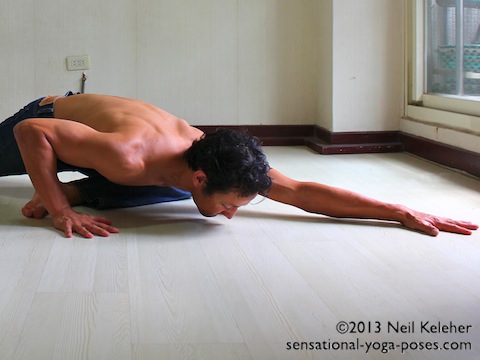
With pelvis level from side-to-side, lay down and reach your arms forwards.
Create Space
Create space in the pose by reaching your spine and arms forwards, away from your pelvis. Use your front leg to push your pelvis back, away from the front knee.
As you push your pelvis back, reach your back foot back also.
In Low Pigeon Pose the instructions started with using your arms to push your ribcage and pelvis back, like in downward dog.
For this version of pigeon yoga hip stretch, use the front leg to push your hips back (and down).
- To add weight to the hip stretch slowly lift the back knee.
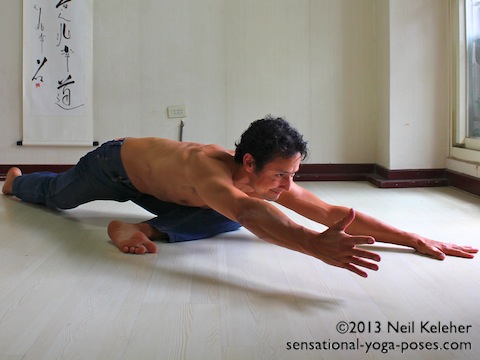
- Add more weight to the stretch by lifting the back-leg-arm, then reach it forwards.
Both of these actions add weight to the back leg side of the body. Because of that, vary the downward pressure of the front knee so that you keep your pelvis level.
Try to keep your pelvis level from left to right as the weight of your lifted leg and arm cause your body to sink.
In the pictures I have the top of my back foot on the floor in pigeon yoga hip stretch. You can use this foot position or tuck the toes under.
In either case you may find that you have to press the foot down to lift the back knee and keep it lifted.
Gradually Deepening the Pigeon Yoga Hip Stretch
Generally, the hip stretch deepens the further forwards you have your front foot (increasing the angle between shin and thigh). (And the further down you can sink your pelvis.)
One ideal is to have your front shin parallel to the front of your mat so that the front knee is open to almost 90 degrees.
If your knee hurts in this position, then don't do it. Or figure out a way to do it that doesn't cause your knee to hurt.
This can be challenging (and painful.) So I like to work towards this foot position gradually.
- Start with your foot back so that your knee is open about 45 degrees. Hold for about a minute.
- Then come up out of the pose and move your foot forwards a little bit. Go back into the pose.
- Then repeat one more time with your foot repositioned so that your front shin is parallel to the front of your mat. Aim for a minute but don't feel bad if you have to come out earlier.
Move Slowly
In all variations move slowly, particularly when sinking your chest down.
If your knee hurts, change the way that you move into the pose. Try moving your pelvis slightly forwards or backwards (or to either side) till you can find a position where your knee doesn't hurt.
Practice moving into and out of pigeon yoga hip stretch (and any other pose or stretch) smoothly and slowly.
Use the Floor for Leverage
If you find it difficult to keep your front leg hip lifted, particularly in the final repetition of pigeon yoga hip stretch, you may find it helpful to start with the front-leg-arm out to the side. Use it to help brace your body.
Then as you lower your torso and as you find your way into the stretch you can gradually move your arm forwards.
When lifting the back-leg-arm, particularly in the final version of the pose, you may find that it helps to push your front leg knee down into the floor with greater pressure. You may also find that it helps to press the foot down. Or you may find it helps to do both but with slight differences in pressure between the foot and the knee.
You might also find that it helps to shift your torso slightly one way or another.
Move Mindfully: Stabilize First, Then Lift
When lifting your back-leg-arm, rather than suddenly lifting the arm, try to pressurize your foundation where necessary (press down) and slowly lift the arm. Likewise with the back knee. Instead of suddenly lifting your back knee, notice the feeling in your back foot and pelvis as you slowly lift it. You can then notice the sensation of "adding weight" to the pose.
Published: 2012 02 03
