Stretching the arms separately and together
These arm and shoulder stretches can be done one arm at a time or with both arms at the same time.
Doing one arm at a time makes it easier to focus on that arm. It can also make it easier to work on differences between the left and right arm and shoulder. Plus, working on one arm at a time, you can rest the other arm.
Working on both arms at the same time, you can compare arms. It can also tend to be a bit harder in that you can't "cheat" the stretch. And it's also harder because you are using both arms at the same time.
An overview of these two arm and shoulder stretches
So, the actual stretches, or rather, an overview.
You can do these in any order. I tend to reach the arms up first and then reach the arms back second. But you can swap the order if you like.
In addition, I tend to like to do single arm stretches first and then do both arms.
Hold the stretch and scan
When doing these stretches the idea is to scan your awareness through the arm. I'd suggest repeating this scanning process 5 times. Then relax. You can switch arms. Or if doing both arms together, rest for a bit, and then repeat.
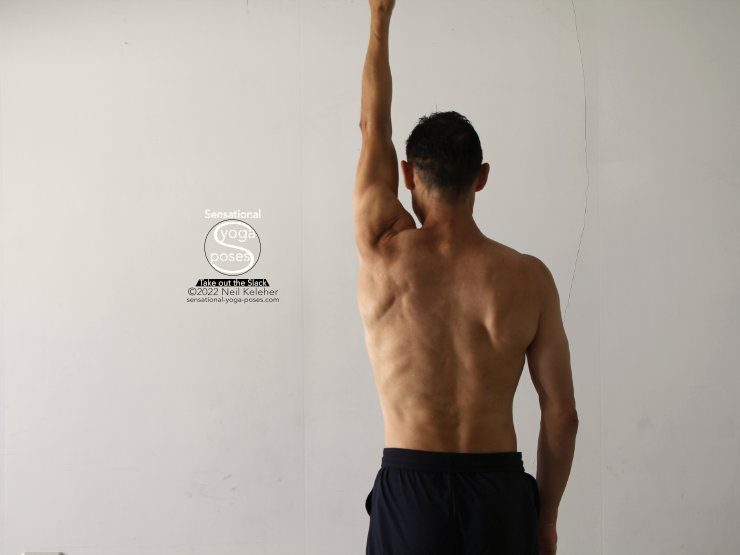
Overhead arm and shoulder stretch
Lift one arm.
To lift one arm, first lift your shoulder. Then reach the arm up.
You can just lift one arm up without worrying about the shoulder. However, if you lift the shoulder first, you can get used to the idea of leading arm movements with your shoulder.
Scanning elbow and hand
Straighten the elbow. Feel your elbow straighten. It should feel strong.
Next, make sure that your palm faces inwards. Open your palm. Lengthen your fingers and spread them out. Here again, feel the body part that is working. Feel the tension in your palm as you "open it". Feel the tension and strength in your fingers as you spread and lengthen them.
Repeat this a few times moving your awareness between your elbow and your palm and fingers. Then try it on the other side.
Scanning your collar bone
Next, going back to the first arm.
Lift the shoulder first and then lift the arm.
Straighten your elbow, open your palm and spread your fingers.
Now, focus on your collar bone. Lift your collar bone as high as possible.
The collar bone attaches to your sternum.
The outer end attaches to the shoulder blade above the shoulder socket. So when you lift your collar bone it's basically the outer tip that you are trying to lift as high as possible.
Try to feel the entire collar bone as you lift the outer tip higher. To facilitate this, try adjusting your shoulder position by moving it slightly forwards or backwards.
Integrating the collar bone, elbow and hand scan
So now the scanning process is to feel your collar bone and lift it higher, feel your elbow and make sure it straight. Then feel your palm (open) and your fingers (lengthened and spread.)
Repeat a few times with one arm and then switch sides.
Adding shoulder blade awareness
Now, one more body part to scan is the shoulder blade.
Lift your shoulder and then your arm.
Activate your elbow and hand.
Lift the collar bone higher.
Next, focus on feeling your shoulder blade. Still feeling your collar bone, try to lift your shoulder blade higher.
Focus on feeling the inner edge of your shoulder blade and/or the bottom tip. Move the bottom tip of the shoulder blade outwards and upwards.
Then scan your elbow and then your hand.
Repeat on the other side.
Next you can lift your side ribs
One other thing that you can focus on is your ribs.
Try lifting the same side ribs higher. You can start with the previous adjustments: collar bone, elbow, hand, fingers. Then from there adjust your ribs. Then repeat the process.
Suggested scanning sequence with the arm lifted
Experiment with how you scan these body parts but one suggestion with the arm lifted is as follows:
Elbow, wrist, collar bone, shoulder blade, ribs.
Note, when lifting your ribs higher, try to stay aware of your collar bone, shoulder blade, elbow and hand.
You can use the same scanning sequence when using both arms.
Note that when using both arms you can scan one arm and then the other.
Touching the hands overhead for a bonus shoulder stretch
One additional action you can do when stretching the arms overhead is to try to touch your hands together (or move them closer together) over your head, all while staying aware of your ribs, shoulder elements and arms.
Note that while this can be thought of as a stretch, it's also a strengthening exercise.
To make it as easy as possible to touch your hands together over head (with the elbows still straight) continue to reach your shoulders and side ribs upwards.
You arms should feel "long" when you reach them up. Work at maintaining this feeling of length when moving your hands towards each other.
If you can't touch your hands together don't fret. Work at bringing them closer together while continuing to keep the feeling of length in your arms.
You can try making your neck feel long also. For more on "neck awareness" and avoiding problems like tech-neck of text-neck, check out the tech neck article.
Stretching the shoulder and arm with the arm reaching back Part 1
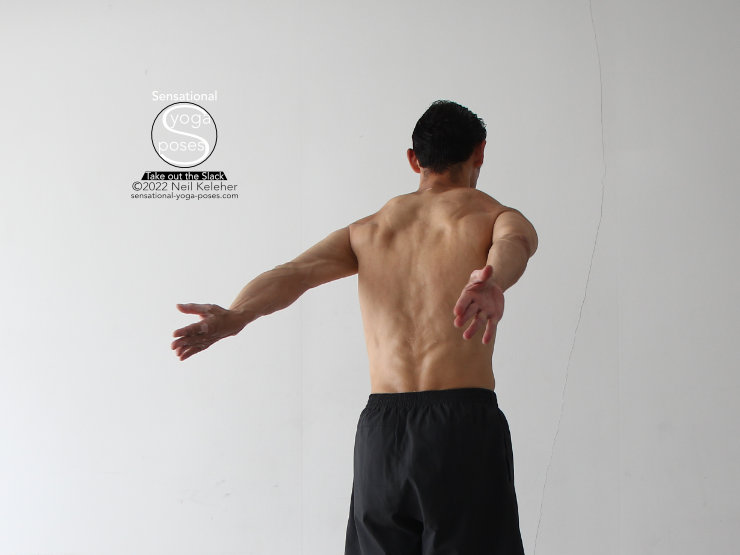
The next exercise is to scan the arm while reaching it back.
Start by moving your shoulder back.
Then reach the arm back with the palm facing outwards and the point of the elbow facing inwards.
Scan your elbow and hand (wrist, palm and fingers)
As with the arms-up position, feel your elbow, make it feel straight and strong. Then feel your palm (open it) and make your fingers feel long (and spread them out.)
And try to reach your arm back and up.
While holding the palm facing out position, reach your collar bones back. Keeping your collar bones pulling back, lift your shoulder blade and then lower it, pulling it down your back. I normally only do this part once (lifting the shoulder blade and then pulling it down), at the beginning of the stretch.
From then on, the scanning process is to feel your collar bone pulling back. Feel your shoulder blade pulling down. Feel your elbow and hand and reach the arm back and up.
For this elbow pointing inwards variation, you could also focus on keeping your chest lifted!
Arm reaching back stretch, part 2
With your arm still reaching back, drop your chest and turn your arm inwards so that both your palm and the point of your elbow point out.
When scanning this position, first emphasize pulling your chest down.
Then pull your collar bone down.
For the shoulder blade, focus on pulling it up and then forwards.
From here, reach the arm further up and back while keeping the elbow, palm and fingers active.
For the shoulder blade action, you could imagine it being as if you are trying to pull or flip your shoulder blade over the top of your ribcage. So, as your collar bone moves down, the shoulder blade first moves up, then as it moves higher up the back, it then also moves forwards, partially tipping over the top of the ribcage.
At least that is what it can feel like.
The two parts of the arm reaching back stretch
For the first part of the arm reaching back stretch, the arm is externally rotated. The point of the elbow points inwards (towards the opposite side). For the second part the arm is internally rotated. The point of the elbow points outwards.
For the first part of the stretch, focus on lifting your chest and your collar bone. (Shoulder blade moves down).
For the second part of this stretch, focus on pulling your chest and collar bone down. (Shoulder blade moves upwards and forwards).
Try the same process when reaching both arms back at the same time.
Final notes on both arm stretching positions.
Once you learn the scanning sequence for both of these arm and shoulder stretches, work at scanning slowly and smoothly. i.e. don't rush. But also make moving in and out of each position, and adjusting each element, slow and smooth.
For both positions, arm(s) up or arm(s) back, work to continually reach further upwards or rearwards. By scanning each element in turn, you are looking for the space to deepen the stretch. You look for that space by feeling the element in question.
Published: 2021 10 02
