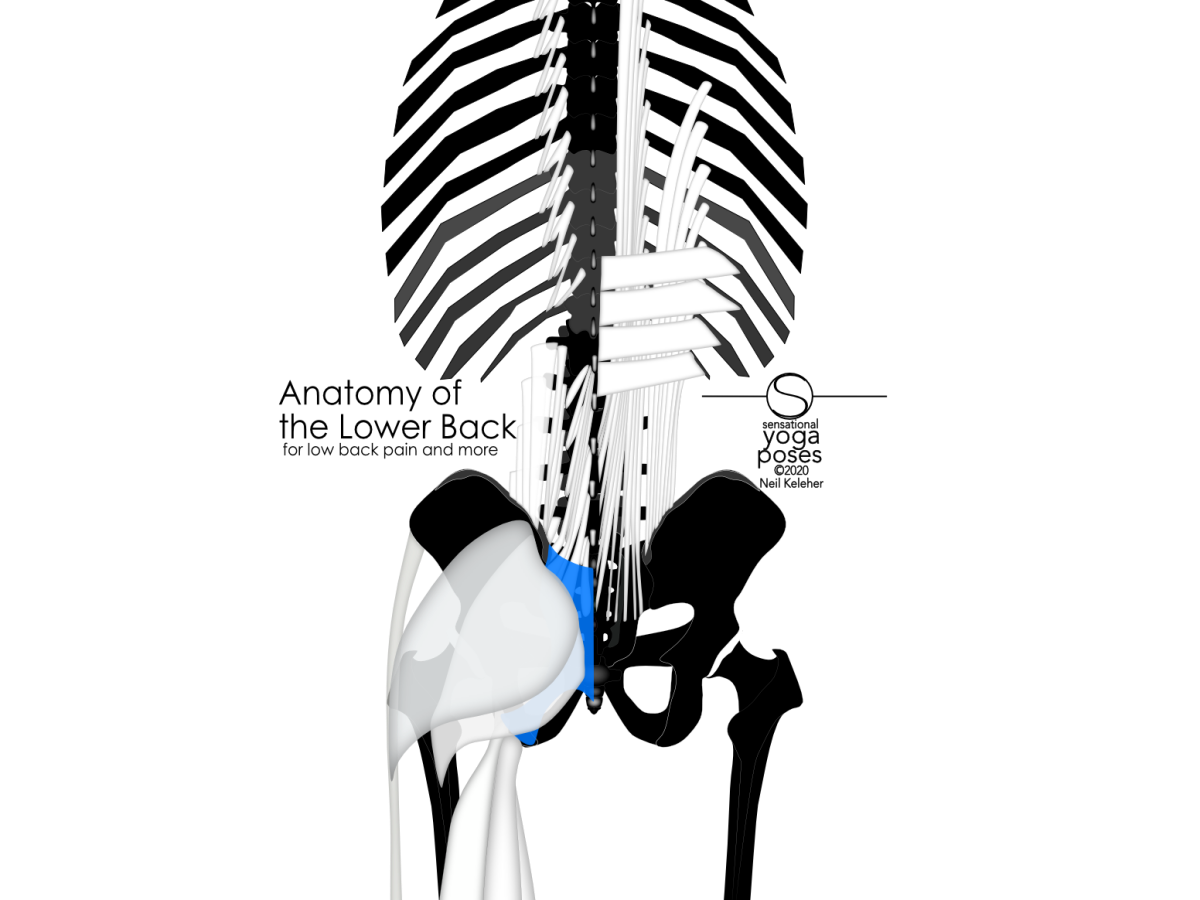
Many of the muscles that work on or across the lower back attach directly to the hip bones. If the hip bones are stabilized, then these muscles have a stable foundation from which to work on the lower back.
Some lower back muscles attach directly to the sacrum. And so if the sacrum is stabilized, then these muscles will also have a foundation from which to work effectively on the lower back.
Whether dealing with low back pain or simply trying to use the back effectively, a good starting point is learning to stabilize the hip bones and/or the sacrum.
Stabilizing the hip bones
It's possible to stabilize the hip bones and sacrum together using muscles that are intrinsic to the pelvis. You'll then be stabilizing the SI joints.
It's also possible to stabilize a single hip bone. You can do that by using hip joint muscles against each other. You can also do it by stabilizing the foot and lower leg against rotation so that the long hip muscles (which attach between the lower legs and the hip bone) then have an anchor from which to stabilize the hip bone.
Another option for stabilizing a single hip bone (or both hip bones together) is to stabilize the ribcage first. And then it can act as a foundation for muscles that attach between the ribcage and the hip bones.
Note, the better you can feel and control your hip bones, and the above mentioned elements, the easier it is to stabilize them or the SI Joints or both.
If you can feel your hip bones, sacrum, lumbar vertebrae, thoracic vertebrae and ribs, then it will be easier to apply the ideas from what follows.
If you don't have that ability, not to worry, it's relatively easy to learn!
Most of us know the lower back as the area of the spine that connects the ribcage to the pelvis. In other words, we may tend to think of the lower back as the lumbar spine. We're going to expand that definition of the lower back, but even so, the lumbar spine is a key component. And it does help to understand how it can move.
In general the lumbar spine can bend forwards and backward and from side to side. It also has a limited ability to twist.
All of these actions can be felt and controlled.
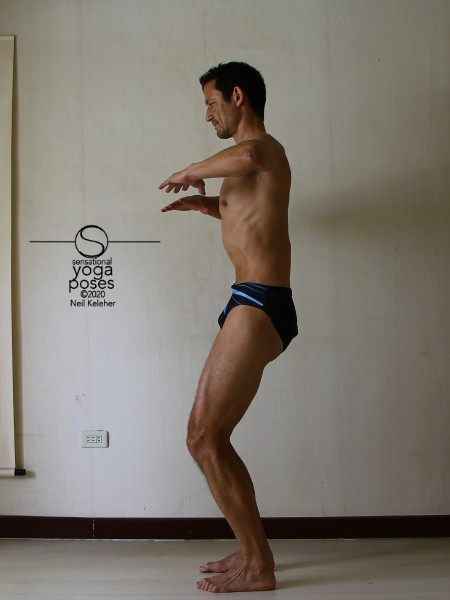
Forward bending or flattening the lumbar spine.
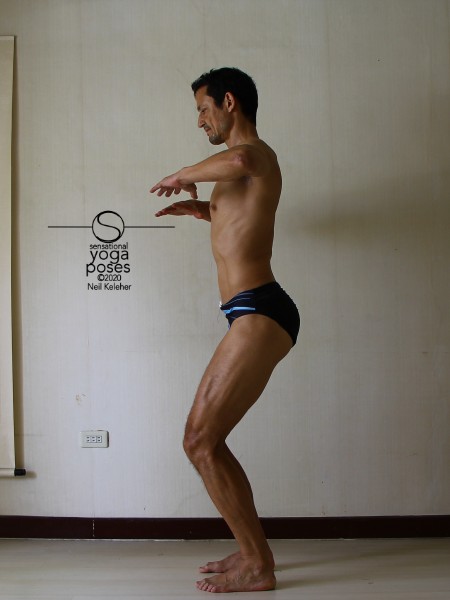
Back bending the lumbar spine.
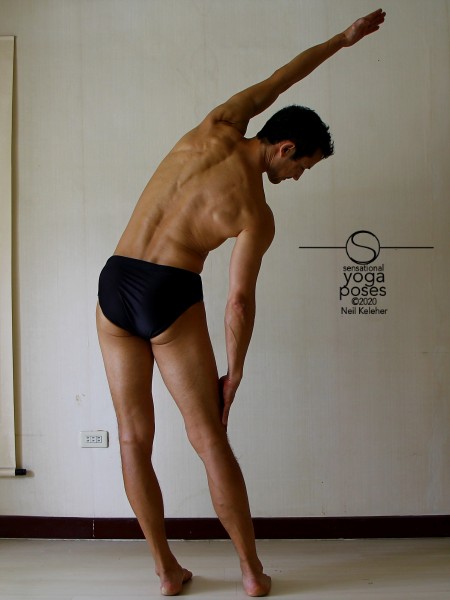
Side bending the lumbar spine.
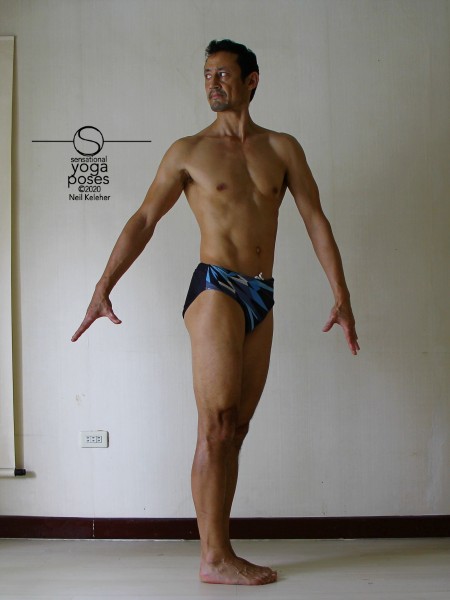
Twisting the lumbar spine.
Why are the lumbar vertebrae so bulky or massive?
The typical view of why the lumbar vertebrae are bulky is because they have to bear the weight of the upper body.
I'd suggest instead, that the lumbar vertebrae are bulky because they have to deal with transmitting force moments, or torque, from the legs to the upper body and vice versa.
In contrast, the elements of the cervical spine are less bulky because they have to contend only with the skull, which though heavy, doesn't have the same moment potential as the legs.
To get an idea of the importance of torque and bracing for it, you can compare the skeletons of a snake and an ostrich.
A snake skeleton has no sternum but lots of ribs. In part the lack of a sternum is what allows its body to be so flexible, but in addition it doesn't have limbs to generate torque and so it doesn't need a sternum.
On the other hand, the sternum of an ostrich or emu is massive. The wings of these birds can generate a lot of torque. Their sternums help to withstand that.
Likewise, our legs can generate significant torque. Our lumbar spine, and it's accompanying musculature, is built to help transmit that.
Like most elements of the spine, the lumbar vertebrae consist of a cylindrical shaped body, behind which is angular "loop" of bone that provides a channel for nerves as well as mounting points for two sidewards projecting transverse processes and a single rearward projecting spinous process. These three projections provide leverage for the muscles that attach to them.
The main connection between adjacent vertebrae is via intervertebral discs that are sandwiched between the bodies of adjacent vertebrae forming the weight bearing stack of the vertebral column. A ligament runs down the front of this stack and in the lumbar region I'll assume that tension in this ligament can be affected by activation of the psoas muscle which has fascicles that attach both to the bodies of the lumbar vertebrae as well as to the intervening discs.
Facet joints help to define vertebral movement possibilities
While the discs allow the vertebrae some freedom of movement relative to each other, they don't necessarily "define" the movement possibilities of vertebrae relative to each other. For that, adjacent vertebrae are also connected, and their relative movement limited or defined via pairs of facet joints.
Facet joints project upwards and downwards from each vertebrae at the side of the channel behind the bodies, in general at the junction of the laminae and pedicles. The matched convex and concave surfaces of these joints help allow front-back and side bending as well rotation to varying degrees.
Vertebral pedicles and lamina
Pedicles join the bodies to the transverse process while laminas join the transverse processes to the spinous processes.
Both of these components are important force transmitting devices. The lamina transmit forces from the spinous process to the facet joints.
The pedicles transmit forces from the facet joints, spinous process and transverse processes to the body and vice versa.
Lumbar facet joints limit lumbar rotation
In the lumbar region, the facet joints are oriented in a way that tends to restrict rotation of the lumbar vertebrae relative to each other. Note that because the lumbar vertebrae don't have ribs attached to them, leverage for twisting is limited. What leverage there is is provided by the transverse processes, and the spinous process of each vertebrae.
Muscles that attach to the front of the lumbar spine and can potentially cause it to twist or resist twisting are as follows:
The obliques can be used to twist the lumbar spine indirectly via the expedient of turning the ribcage relative to the pelvis or vice versa.
Muscles that attach to the back of the lumbar vertebrae and that can help it to twist include :
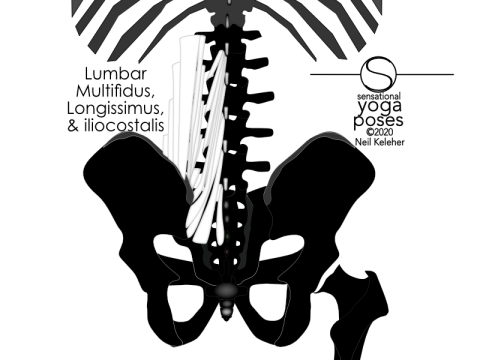
- lumbar multifidus.
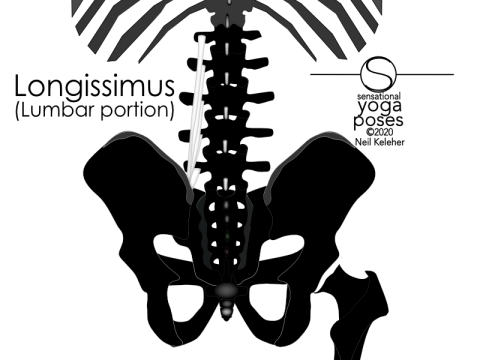
- longissimus thoracis, lumbar portion
(longissimus thoracis pars lumborum)
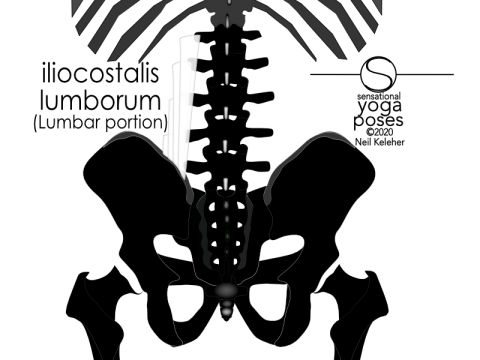
- iliocostalis thoracis, lumbar portion
(iliocostalis thoracis pars lumborum)
Note that where longissimus and iliocostalis extend upwards from the hip bones to attach to the lumbar transverse processes, multifidus extends upwards to attach to the lumbar spinous processes.
Twisting the lumbar spine and feeling it
All of these muscles may help to control twisting of the lumbar spine, either trying to cause it or resist it. More importantly, they can help to generate sensation which you can use to feel your lumbar spine (and thus better control it!)
Do you have to use the obliques to twist the lumbar spine?
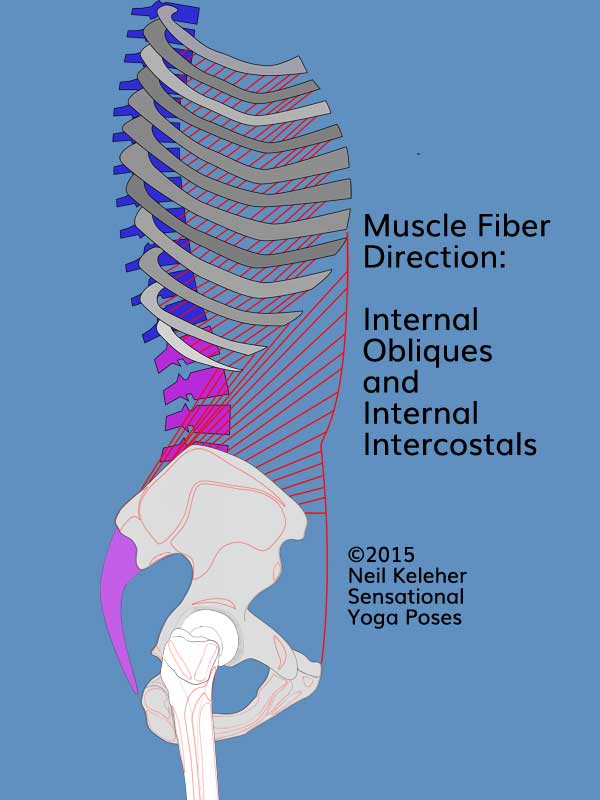
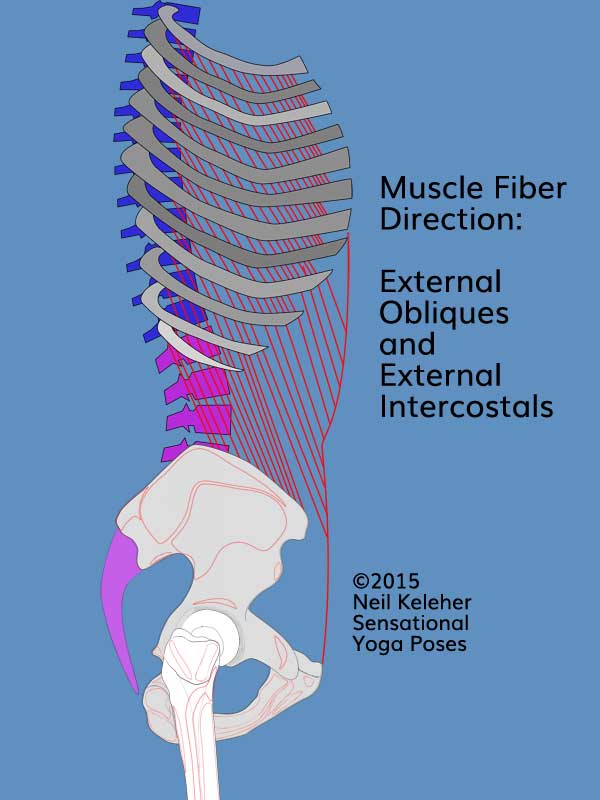
The obliques (internal and external) cross the waist, and can be used to turn the ribcage relative to the pelvis and vice versa.
Are the obliques always active when twisting the spine?
It is possible to turn the lumbar vertebrae relative to the hip bones without using the obliques (or the arms). In this case you could be using muscles that act solely, or mostly, on the spine, in addition to muscles that act on and connect to the backs of the ribs.
The obliques can come into play when greater forces are being contended with.
Whether or not you are trying to use the obliques, when twisting, you can focus on feeling the lumbar vertebrae as well as the sacrum while twisting. The same muscles that can help twist it will generate sensation while active thus enabling you to feel your lumbar spine while you try to twist it, even if the twist is very limited in scope.
To make twisting easier, you could use your hip bones as references, keeping them relatively stable. Then generate a twist on your sacrum relative to your hip bones and from there twist each successively higher lumbar vertebrae relative to the vertebrae (or sacrum) below. You can carry this twist up into the thoracic spine, there focusing the thoracic vertebrae as well as the ribs.
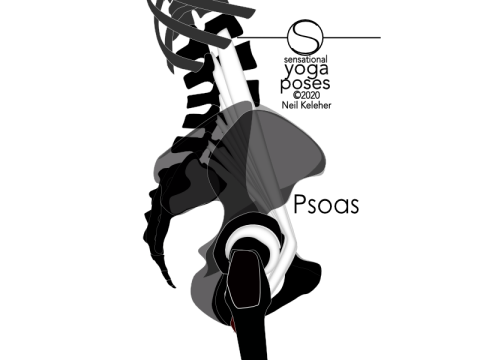
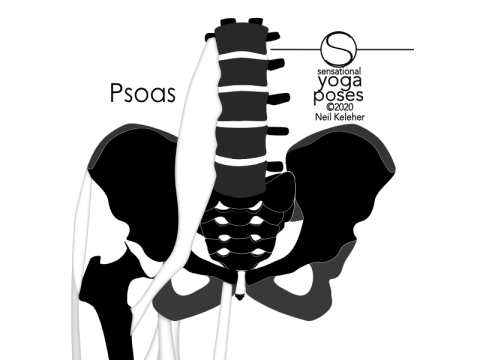
The psoas muscle attaches not just to the bodies of the lumbar vertebrae and the intervening discs, it also attaches to the fronts of the transverse processes.
Note that the attachment of the psoas to the discs (and possibly to the ligament that runs down the front of the vertebral bodies) may enable it to add tension the the walls of the discs, helping to prevent bulging even as the psoas works to compress the discs.
Thus, the more the psoas (and opposing muscles) work to compress the discs, the more the discs resist being compressed.
This can be due to tension in their outer walls that is created by the same muscles that create the compression.
Running down the front of the lumbar spine, the psoas passes forwards and downwards (ventrally and caudally) to the front lip of the pelvis, before bending around it. From there it passes rearwards and downwards (dorsally and caudally ) to attach to the top of the femur.
The attachment point is at the lesser trochanter which is positioned on the inside of the top of the femur, towards the back edge, just below the neck of the femur.
Does the psoas help to rotate the lumbar spine?
Does the psoas twist the lumbar spine?
I would suggest that it can.
Acting from a femur that is stabilized against flexion and against internal rotation, the psoas activating on, say, the left side could be used to help rotate the lumbar spine to the right by pulling forwards (as well as downwards) on the left side of the lumbar vertebrae.
Using the psoas to twist the lumbar spine while standing upright
In a standing position, with torso upright, the psoas on the left side will create a forwards pull on the left side of the lumbar vertebrae while at the same time creating a backwards push on the hip bone.
So when using a single side psoas to twist while standing, you may find that your hip bone on that side tilts forwards. Your gluteus maximus will probably activate to help oppose the forward tilt as well as to help prevent the hips from pushing rearwards.
Using the psoas to twist the lumbar spine with hips bent forwards
Using the psoas to twist the lumbar spine while sitting in a chair, or with the hips bent to a point where the psoas fibers no longer bend around the front of the hip bone, then the psoas will no longer create this backwards push on the hip bone.
What you may then get is the hip bone and lumbar spine turning more or less together, unless here again the gluteus maximus activates to help control movement of the hip bone.
If both the hip bone and femur are stabilized, then it may be possible to use the psoas more effectively to help twist the lumbar vertebrae while the hip is bent forwards (flexed).
How the psoas can help generate proprioception of the lumbar spine
In order to activate, muscles need an opposing force to work against. In the absence of an externally applied force, this can be provided by opposing muscles.
With sustained activation, opposing muscles not only create stability (by working against each other), they also create sensation. And so the psoas, if nothing else, helps you to feel your lumbar spine during spinal twisting actions.
It does so by creating a downwards force on the fronts of the lumbar vertebrae so that muscles like the lumbar multifidus, lumbar portion of the longissimus thoracis and lumbar portion of the iliocostalis lumborum can oppose it by creating a downwards pull on the back of the lumbar vertebrae.
While you may not feel the psoas activating, you can feel the muscles at the back of the spine, and thus gain proprioception.
Note that the quadratus lumborum may substitute for the psoas in generating a downwards pull on the fronts of the lumbar vertebrae.
Interactions of the transverse abdominis, diaphragm and quadratus lumborum
The transverse abdominis is the only abdominal muscle that consistently attaches to the lumbar vertebrae.
Its belt-like fibers pass around the waist, from front to back. At the back of the abdominal space, they merge with other muscle and connective tissue fibers to help form the front wall (and perhaps also a portion of the back wall) of the lumbar portion of the paraspinal rectinacular sheaf (PRS), the sheaf of bone and muscle that helps to cover each half of the paraspinalis muscles, the muscles that work on the back of the spine and ribcage.
The transverse abdominis passes behind the quadratus lumborum
As it connects to the lumbar transverse processes, the Transverse abdominis passes behind the quadratus lumborum (as well as behind the back of the psoas). The bulk of its fibers could be considered as helping to form the front wall of the PRS in the lumbar region, and so you could think of the transverse abdominis as passing between the quadratus lumborum and the spinal erectors.
One reason I mention this is because tension in the transverse abdominis may affect the quadratus lumborum. It could be used to help remove slack, or to add length to the longer more lateral fibers of this quadratus lumborum, enabling them to effectively activate.
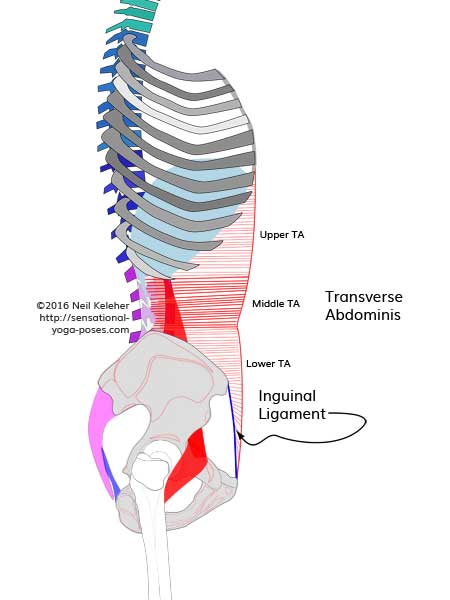
The lower and the upper band of the transverse abdominis
It's worth noting here that there are two portions of the transverse abdominis that don't extend fully around the waist.
The upper portion of the transverse abdominis connects to the lower ribs and is important with respect to the serratus posterior inferior and stabilizing the lower part of the ribcage.
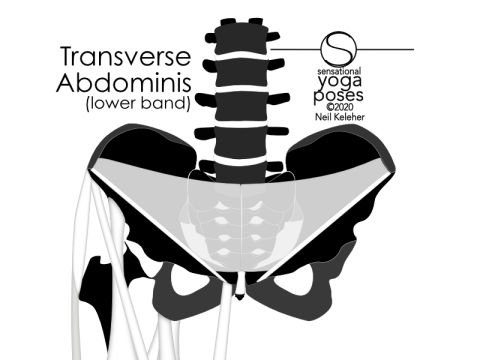
The lower portion connects to the front of the hip bones, at the ASIC and inguinal ligament and is important with respect to the pelvic floor muscles and stabilizing the SI joints or the pelvis as a whole.
All three bands of the transverse abdominis (upper, middle and lower) can be important when trying to understand lower back anatomy and lower back pain.
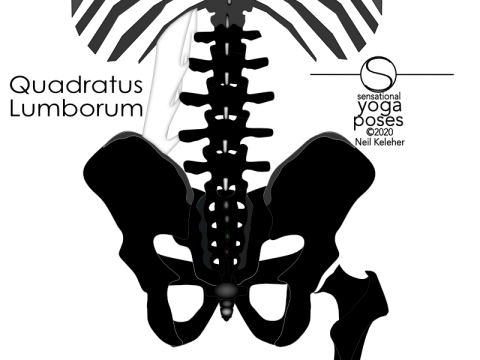
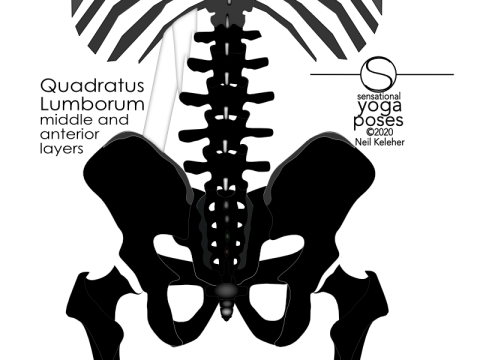
The quadratus lumborum, like the psoas, attaches to the transverse processes of the lumbar vertebrae. It runs upwards from the hip crest to the lumbar vertebrae and to the lowermost rib. It also, in some cases, runs from the lower most pair of ribs to the transverse processes.
It's position in front of the back wall of the transverse abdominis suggests that it can substitute for the psoas (or vice versa) when required to create a downwards pull on one or both sides of the lumbar spine.
Like the psoas it can exert a downwards pull on the lumbar transverse processes, assuming a fixed hip bone from which to act. Working from the bottom rib downwards, it can also create an upwards pull on the sides of the lumbar vertebrae.
The quadratus lumborum, along with the lumbar portions of the iliocostalis and longissimus muscles can help support or stabilize the lumbar spine laterally, helping to control lateral tilt of the pelvis relative to the ribcage and vice versa.
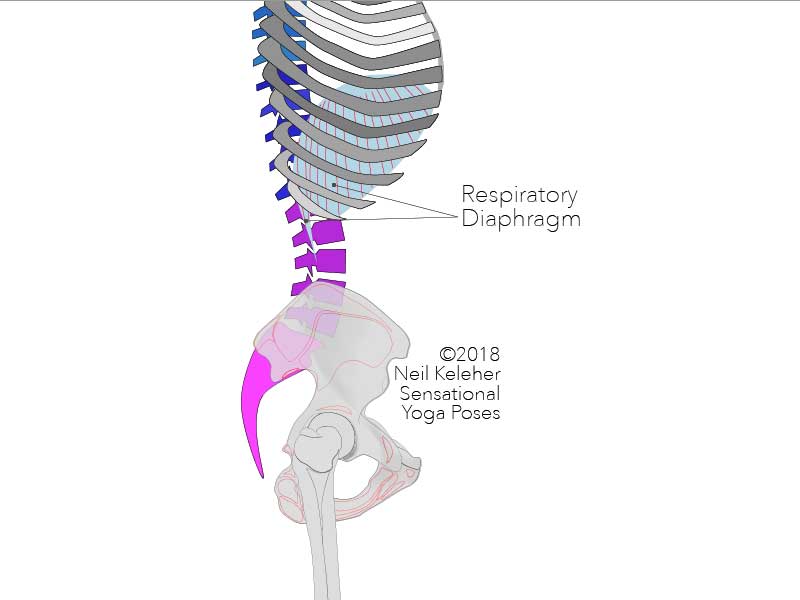
In looking at muscles that act on the front of the lumbar vertebrae, one other muscle we should consider is the diaphragm.
The respiratory diaphragm has fascicles that attach to the lumbar spine from above downwards. It's troubling however in that the right and left sides tend to attach differently, with one side reaching further down than the other. The effect of these different length attachments may be mitigated by ligamentous attachments and by the asymmetrical shape of the diaphragm in general.
Note that to use the diaphragm effectively on the lumbar spine, it would help to lift and stabilize the ribs, since the bulk of the diaphragm attaches to the inner surface of the ribs.
The fibers of the quadratus lumborum that attach from the lower most pair of ribs to the lumbar vertebrae (as well as the hip bone) could be used to help anchor the diaphragm when the diaphragm
is active.
Reverse breathing (the opposite of belly breathing), a breathing technique that expands your lower back
In a breathing technique often called "reverse breathing", you can feel like you are inhaling into your lower back. You could also extend this feeling so that it feels like you are breathing into the backs of your ribs as well as your lower back!
In normal diaphragmatic breathing (or at least one possible type of diaphragmatic breathing), you contract the diaphragm downwards to inhale and as you do so you allow the transverse abdominis (and other abdominal muscles) to lengthen. As a result, your belly will expand so that you look pregnant. Then you pull inwards on the transverse abdominis to reverse the process and create an exhale. In both cases, both sets of muscles are working, they just take turns lengthening and shortening. Because this type of breathing expands the belly during the inhale phase, it's also known as belly breathing.
For reverse breathing, instead of the front of the belly expanding, the lower back lengthens during the inhale phase. And instead of the diaphragm working with the transverse abdominis, it works with the quadratus lumborum.
Starting with the front ribs slightly down, the idea is to anchor the front ribs and prevent them from lifting by exerting a downwards pull using the rectus abdominis, the six pack muscle.
You don't even have to focus on using your rectus abdominis. Instead, just prevent your sternum from lifting (or lowering).
For an inhale, the diaphragm contracts downwards. With the front of the ribcage anchored, the only way the diaphragm can move downwards is for the lower back to lengthen. For this to happen, the back of the ribcage moves up, away from the back of the pelvis. Since the lumbar spine connects the two, it has to straighten to facilitate this movement. To give the diaphragm an opposing force to work against the quadratus lumborum activates to create a downwards pull on the lowest pair of ribs. As the lower back lengthens, it lengthens, while staying active and thus provides the sensation of your lower back lengthening or expanding.
During the exhale portion of this type of breath, the diaphragm gradually relaxes and lengthens and the lumbar curve returns as the back of the ribcage is pulled down by gravity.
The thoracolumbar junction is the place where the lumbar spine meets the thoracic spine. Like the sacrum and SI joints, this region can be important when looking at good back function and when dealing with low back pain.
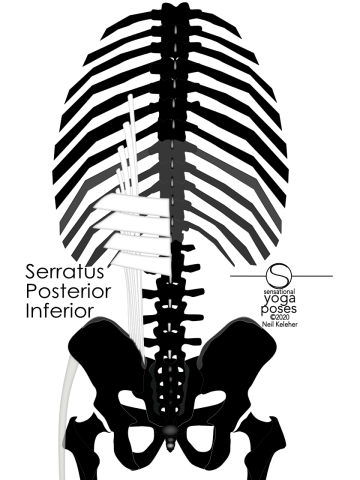
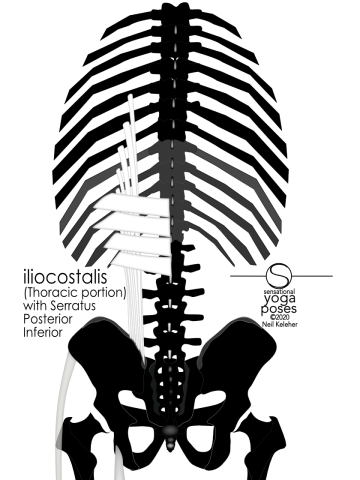
A muscle that crosses the thoracolumbar junction from the rear is the serratus posterior inferior.
Serratus posterior inferior attachment points
Attaching to the back of the ribs outside the bounds of the spinal erectors, the serratus posterior inferior muscle has fascicles that attach to the lowest four ribs. From there they run inwards (medialwards) and downwards (caudally) to attach to the the vertebrae immediately above and below the thoracolumbar junction.
More specifically it attaches to the bottom two thoracic vertebrae, at the bottom of the ribcage, and the upper two lumbar vertebrae which are at the top of the lumbar spine. In both cases they attach to the spinous processes and the intervening ligaments.
What does the serratus posterior inferior do?
From a stabilized upper lumbar and lower thoracic spine, the serratus posterior inferior can generate a downwards (caudal) and inwards( medial) pull on their respective ribs, or resist them being pulled upwards (rostrally) and outwards (laterally).
As a side note this can be used for anchoring the fibers of the latissimus dorsai that attach to the lower three ribs.
The upper fibers of the transverse abdominis lace the front arch of the bottom half of the ribcage.
Where activation of the serratus posterior inferior can create a downward pull on the backs of the ribs in turn causing the fronts of those ribs to lift and move outwards, the upper transverse abdominus can resist that tendency by pulling inwards on the fronts of the ribs.
Other muscles, possibly the diaphragm, and possibly the internal obliques, may also be involved.
Together, these muscles can stabilize the lower half of the ribcage and thoracolumbar junction.
Why stabilize the thoracolumbar junction?
Where the arms are being used, using the serratus posterior inferior against the upper band of the transverse abdominis can be a useful action to help stabilize the lower part of the ribcage, which is, because of the lack of sternal attachments, the more flexible part of the ribcage.
With this part of the ribcage stabilized, muscles that work between the ribs and the scapula (and collarbone) have more of a stable foundation from which to effectively control the shoulder girdle (the sum of the collar bones and scapulae).
Going back to the idea of moment arms (or torques), a stabilized lower ribcage means that the ribcage as a whole can deal with greater torques generated by the arms.
Stabilizing your lower ribcage for better arm strength
From another point of view, if you want to exert more strength with your arms, then it may help if you stabilize the lower half of your ribcage. That in turn means that your thoracolumbar junction is also stabilized. And that can be particular important in actions or exercises where the arms are used asymmetrically.
Stabilizing your lower ribcage to anchor your legs
Another reason to stabilize the thoracolumbar junction, and thus the lower ribs, is so that muscles that attach between the ribs and hip bones have a stable foundation from which to anchor the hip bones. (This can include the psoas). This then can make it easier to use the legs, say while hanging from the arms or while standing on one leg. In this latter case, you might want to anchor the ribs to help give a better foundation for the lifted leg.
Note this is one way of creating stability from the center of the body outwards.
The bottom of the lumbar spine attaches to the sacrum and that in turn attaches, via the SI joints, to the hips. However, there is some overlap. The lowest lumbar vertebrae has significant connective tissue attachments to the hip bone, as well as muscular attachments. Not only that, the sacrum moves with the lumbar spine thus affecting the hip bones and it moves with the hip bones, thus affecting the lumbar spine.
Sacroiliac joints have clearly defined movements
The SI joints control the relationship between the hip bones and the sacrum. In an experiment focusing on SI joint movements, it was found that clamping the hip bones reduced the movement potential of the sacrum relative to the hip bones. The point here is that the sacroiliac joints are designed to allow the sacrum to move relative to the hip bones and to allow the hip bones to move, via the si joints, relative to each other.
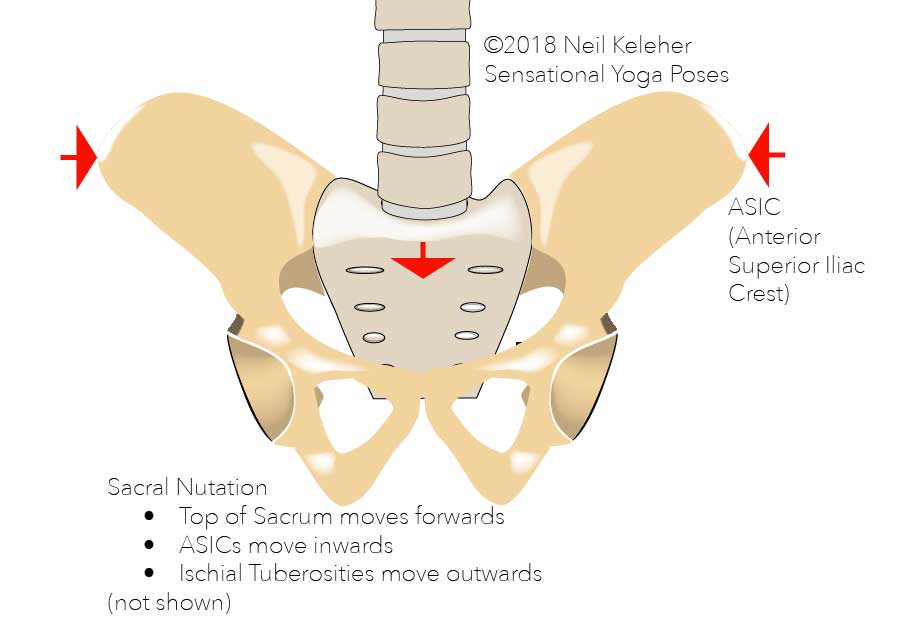
Nodding the sacrum forwards relative to the hip bones (I'll assume relative to both hip bones for this description though do bear in mind that the hip bones can move asymmetrically!) the ASICs (the front points of the hip bones) move inwards while the sitting bones (or ischial tuberosities) move outwards.
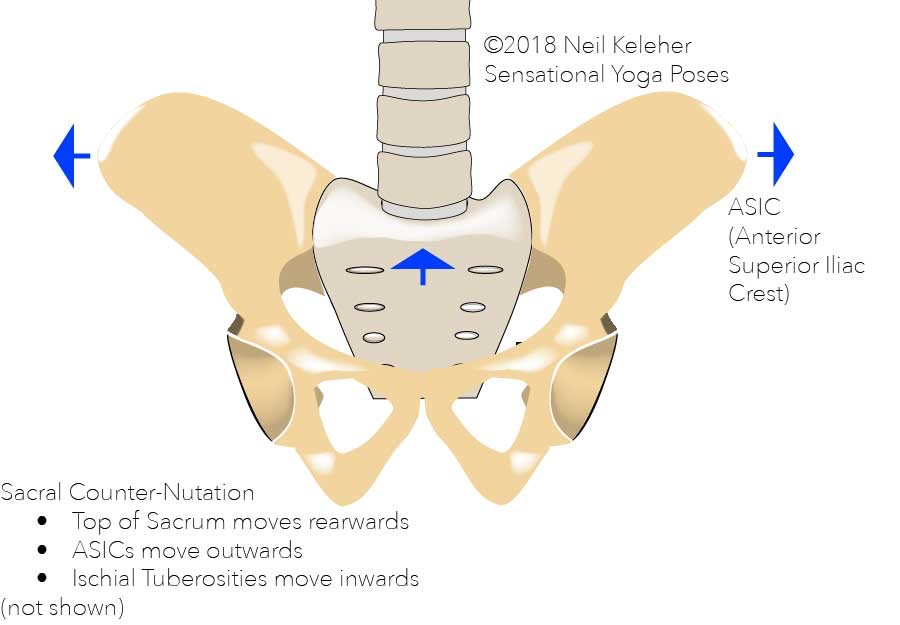
The opposite happens when the sacrum nods backwards.
These movements are respectively nutation (nodding forwards of the sacrum) and counter-nutation (nodding backwards of the sacrum).
It is possible to feel your SI Joints? Does this matter if you are a guy?
In guys the movement potential of the si joint tends to be a lot less than in girls, nevertheless, there are muscles that work on the si joint whichever sex you belong to, and when active, those muscles create proprioceptive sensation.
Basically, it's possible to feel your SI joints whether you are a guy or a girl. Just as importantly, we can stabilize them, and that can be important when dealing with lower back pain or just trying to use the muscles of the back effectively.
Focusing on both hip bones as well as the sacrum, muscles that can control the SI Joints include the pelvic floor muscles, the lower transverse abdominis, and the lumbar multifidus and possibly the lumbar longissimus.
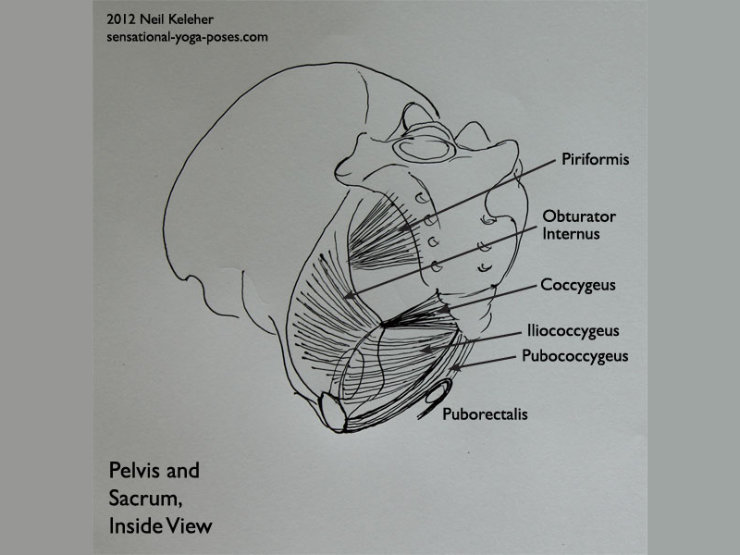
How the transverse abdominis and pelvic floor muscles stabilize the SI Joints
The pelvic floor muscles can be used to pull the bottom tip of the sacrum and tailbone towards the pubic bone while at the same time drawing the sitting bones inwards.
When the lower band of the transverse abdominis activate, they can pull inwards on the ASICs and/or the inguinal ligaments. This causes the sitting bones to move outwards and the sacrum to nod forwards.
To give those muscles an opposing force to work against, and thus stabilize the SI joints, the lower band of the transverse abdominis can also step up to play.
In either action of the sacrum, nodding forwards, or nodding rearwards, the pelvic floor muscles and the lower band of the transverse abdominis can work against each other to help control the movement and keep the SI joints stable.
How the lumbar multifidus and transverse abdominis stabilize (and control) the SI Joints
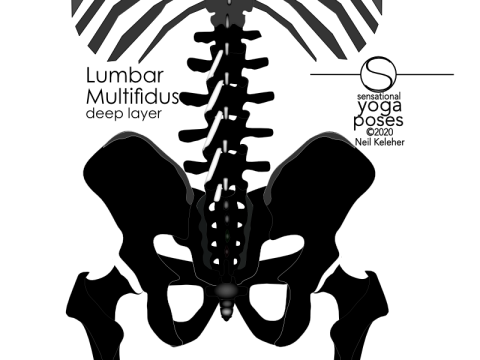
An additional set of muscles that can come into play during SI joint movements is the lumbar multifidus.
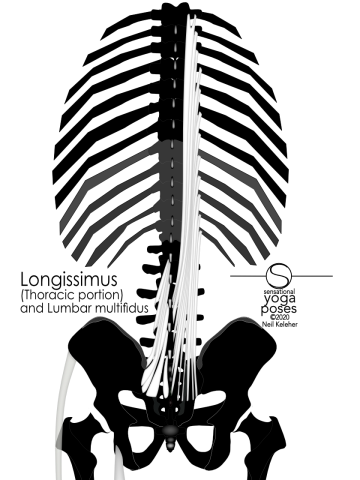
These muscles fill the gaps at the back of the sacrum and lumbar spine and also attach to the inner surface of the back edge of the hip bones, just behind the si joints.
Where activation of the transverse abdominis in particular can cause the backs of the hip bones to try to spread apart, the multifidus that attach there can help resist that tendency.
The multifidus, the thoracolumbar composite and stabilizing the SI joints through compression
Note that by themselves it's unlikely that just activating these muscles, the multifidis can help to resist the back of the hips being pulled outwards. However, there is also a "pump up" phenomenon, which may be relevant here and to the spinal erectors in general.
When these muscles activate, they press outwards against surrounding or encapsulating connective tissue structures, causing those structures as a whole to stiffen and resist bending.
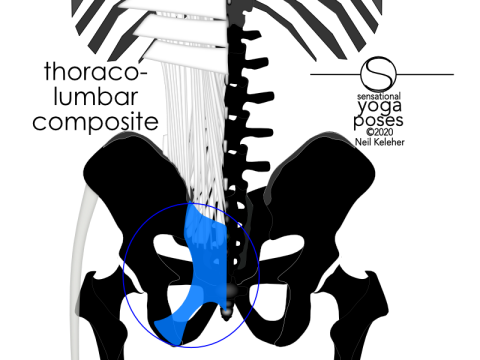
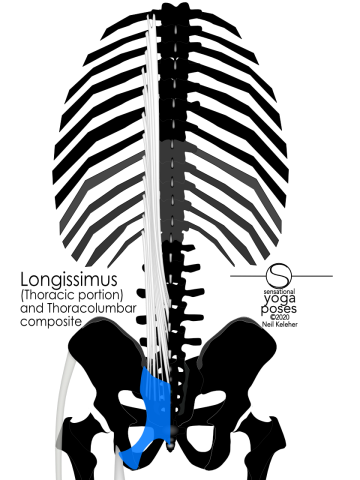
With the lumbar multifidus, they can press rearwards against the thoracolumbar composite, a span of fused connect tissue that joins the backs of the two hip bones behind the sacrum.
Activation of the lumbar multifidus would tend to cause the sacrum to lift and in general, increase the lordosis, or back bend, of the lumbar spine. And so this could actually help nutation, or forward nodding of the sacrum. Thus the multifidus and lower transverse abdominis could work together to help create nutation while at the same time stabilizing the SI joints by compressing them between the two hip bones.
The multifidus and increasing lumbar lordosis
As mentioned, the lumbar multifidus can be used to accentuate the lordosis (back bend) of the lumbar spine and the sacrum. In so doing, they may help to cause forward nodding of the sacrum. They can, in the process, add tension to the thoracolumbar composite which may then cause the ASICs of both hip bones to try to move outwards. This is where the transverse abdominis is doubly helpful as it can activate to resist this tendency and at the same time help to stabilize the SI Joints.
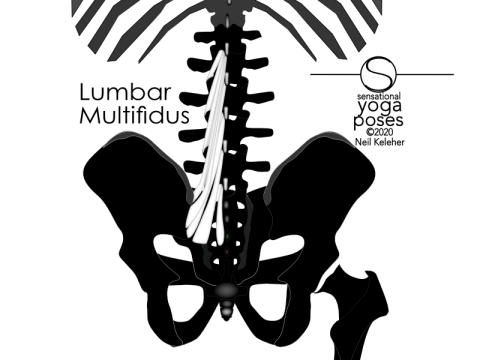
The lumbar multifidus is located closer to the center line of the spine, with attachments to the sacrum and the inner surface of the back of the hip bone.
Passing upwards, the lumbar multifidus cross the sacrum as well as the lumbar vertebrae. In general these muscles could be thought of as attaching to the sacrum, inner edge of the hip bones or the mamillary processess, which are at the rear edge of the superior articular processes. From these points of attachment, the muscles extend upwards and inwards to attach at or near the spinous processes of superiorly positioned lumbar vertebrae.
The deep layer of the multifidus also have attachments to the facet joint capsules. Thus their activation can help to maintain lumbar facet joint integrity.
Rising upwards and inwards, it attaches to the spinous processes of more superiorly located lumbar vertebrae
Anchoring the lumbar multifidus
With the ASICs (and inguinal ligament) pulled inwards towards the sagital center line (so inwards towards the dividing line between the left and right side of the front of the belly), the backs of the hip bones pull outwards and that gives the lumbar multifidus that attach there a foundation from which to create a downwards pull on the lumbar spinous processes.
With only one side working, these muscles can be used to help to bend the lumbar spine and sacrum to the same side, carrying the hip bone with it, or to resist side bending.
With only one side working, these muscles may help a slight amount in twisting the lumbar vertebrae, particularly those parts of the muscle that have attachments to the hip bones.
The thoracolumbar composite is a major component of the thoracolumbar fascia. It spans the gap behind the sacrum and between the backs of the two hip bones. It blends with or covers the sacrotuberous ligaments, which join the sacrum to the ischial tuberosities.
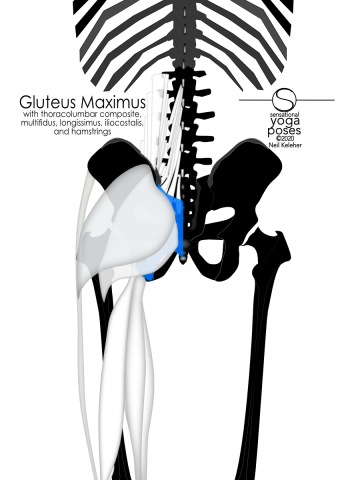
The sacrotuberous ligament could be thought of as an extension of the hamstrings. Both the thoracolumbar composite and the sacrotuberous ligament serve as a surfaces of attachment for the gluteus maximus muscle.
The thoracolumbar composite also includes the aponeurosis of the spinal erectors muscles. And so tension in the thoracolumbar composite can not only help to prevent the back of the hip bones from spreading, it can also help to give the spinal erectors a stable anchor point.
Incidentally, the lumbar multifidus also attach, in part, to the aponeurosis of the spinal erectors.
Two sets of muscles that attach between the hip bone and the lumbar vertebrae from behind transverse abdominis are the lumbar portions of the longissimus and iliocostalis muscles.
Longissimus muscles lie closer to the spine, while iliocostalis is more lateral.
Note that these muscles are located similarly to the quadratus lumborum muscle, however, the quadratus lumborum muscle is positioned in front of the transverse abdominis. Where the longissimus and iliocostalis attach to the back surfaces of the transverse processes of the lumbar vertebrae while the quadratus lumborum attaches to the front surfaces.
Viewed from above, the transverse processes of the lumbar vertebrae are positioned more or less in line with the facet joints.
As such, the quadratus lumborum could be thought of as having a line of action slightly in front of the facet joints while longissimus and iliocostalis have a line of action that is behind them.
Differences between the iliocostalis, longissimus, and lumbar multifidus
Looking at the multifidus, longissimus and iliocostalis, all three muscles tend to rise upwards and inwards.
Longissimus and iliocostalis attach from the hip bones. From there they reach up to attach to the transverse processes of the lumbar vertebrae.
Together they can help to control the relationship between the lumbar spine and sacrum and the hip bones.
Because the multifidus are closer to the center line and can act cross the si joint, it may be a good guess that they tend to activate first.
For longissimus and iliocostalis to act effectively on the spine they need a stabilized hip bone to act from. In particular they need the hip bone to be stabilized in such a way that the PSIS resists lifting.
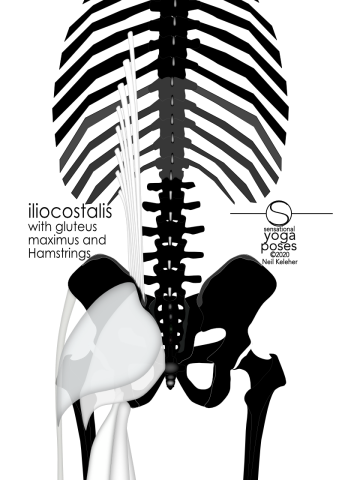
One muscle that attaches close to their insertion point is the gluteus maximus muscle, in particular the superficial fibers (those that attach to the IT band, and via it to the tibia).
Gluteus maximus can resist an upwards pull on the PSIS.
Additionally, the hamstrings can also resist the PSIS moving upwards by creating a downward pull on the ischial tuberosities.
Note that when the gluteus maximus is used to pull down on the PSIS, it can also tend to tip the hip bone to the side. As such, the adductors, particularly the long head of the adductor magnus, may also activate to counterbalance this tipping force.
The lumbar portion of the longissimus attaches from the back of the hip bone and from the long dorsal sacroiliac ligament, near the PSIS, to the transverse processes, close to where they emerge from each vertebrae.
The lumbar portion of the iliocostalis attaches from the back of the hip bone, further to the side than the longissimus, also to the transverse processes, but closer to their tips.
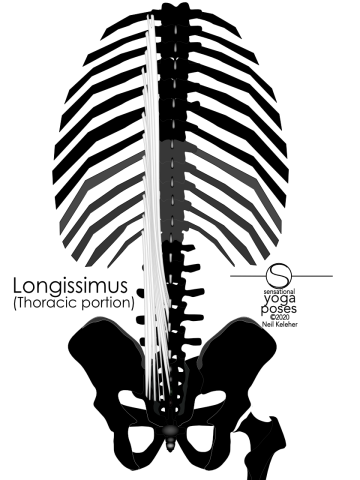
The thoracic portion of the thoracic longissimus extends all the way up to the ribs.
Closer to the spine than the corresponding fibers of the iliocostalis, the fibers of the thoracic longissimus (longissimus thoracis pars thoracic) attaches from the back of the sacrum at a level about even with the top of the upper sciatic notch, as well as to the tips of spinous processes of the lower three lumbar vertebrae.
The fibers of this muscle also attach to the long dorsal sacroiliac ligament which attaches between the hip bone and the back of the sacrum.
Reaching upwards from these points of attachment, the fascicles of this muscle attach to the transverse processes of the thoracic spine and to the backs of the ribs.
Because of their attachment to the spinous processes of the lumbar vertebrae, one option for effective activation of these muscles is to activate the lumbar multifidus first. That then creates a downwards anchoring pull on the spinous processes giving the longissimus a stable anchor from which to create a downwards pull on the backs of the thoracic spine and ribs.
Activation of the longissimus is perceivable as a downward pull on the ribs close the spine. But it's also perceivable as a pull at the back of the sacrum and hip bone, to the rear of each SI joint.
Adding length to the longissimus for more effective activation
As the spine is bent backwards, that tends to shorten the distance the longissimus spans.
Portions of longissimus attaches to the back of the sacrum below the level of the upper border of the thoracolumbar composite.
If the sacrum is nodded forwards, while the lumbar spine is bent backwards, the thoracolumbar composite may help to add length to the longissimus, making it easier for this muscle to continue to create a downwards pull on the backs of the thoracic spine and ribs even when the spine is in a deep back bend.
Long dorsal sacroiliac ligament tension and anchoring the longissimus
Because the thoracic longissimus attaches to the sacrum via the long dorsal sacroiliac ligament, anchoring of this muscle may be accomplished by activating fibers of the gluteus maximus that attach to the sacrum. Alternatively, activating the piriformis may also help.
Practical techniques for anchoring include creating a downward pull on the side of the sacrum on which you want to activate the longissimus. Alternatively, (and this may be easier while sitting upright with the pelvis slightly tilted forward) try creating a rearward pull on the side of the sacrum in question. At the same time you may need to adjust your ribcage posture. Slightly turning it left or right may give you sensation at the back of the SI joint as well as sensation at the back of the ribs just to the side of the spine indicating that the longissimus on that side has effectively activated.
Note that because the SI joints directly affect the hips, it may help to also adjust muscle activation of the hip joint and positioning of the femur relative to the hip bone to get the longissimus to activate.
Note if dealing with anterior hip pain, this may be one part of an approach for dealing with it.
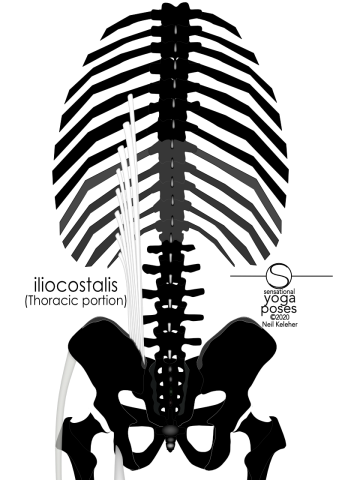
Attaching to the top of the hip crest, from the PSIC forwards, the thoracic portion of the iliocostalis (iliocostalis thoracis par thoracis) passes upwards to attach to the backs of the ribs. Viewed from the back, the attachment points are about midway between the spine and the side of the ribcage.
Acting from an anchored hip bone, these muscles too can create a downward pull on the backs of the ribs.
Adding length to the iliocostalis for more effective activation
If the lumbar spine is already bent backwards, this muscle may be shortened, which may limit its effectiveness.
The serratus posterior inferior crosses the back of the muscle as is runs from the lower ribs to the spine. Lifting the ribs laterally, can add length to both the serratus posterior inferior and the iliocostalis, making effective activation more likely.
Additionally, tension in the serratus posterior inferior could further lengthen the iliocostalis, enabling them to activate (or continue to effectively activate) while the thoracic spine is bent backwards.
Note that the lower ribs (to which the iliocostalis mainly attach) tend to bucket handle outwards. This is in contrast to the upper ribs, which attaching as they do to the sternum, tend to bucket handle upwards in a more forwards-backwards direction.
What muscles can help to lift the backs of the ribs?
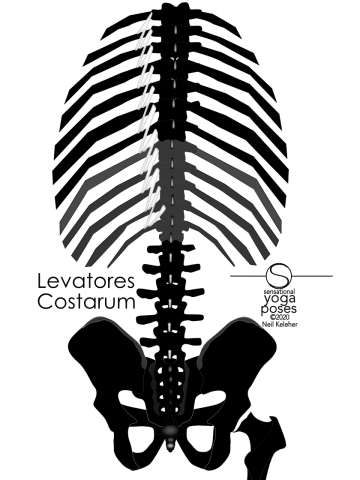
What muscles can help to lift the backs of the ribs? This can be done by intercostals but also by the levator costarum muscles that attach downwards from thoracic transverse processes to the backs of the ribs one or two levels lower.
Anchoring the iliocostalis thoracis
Like the lumbar portion, the thoracic portion of the iliocostalis also attaches to the top of the hip bone, towards the PSIS. To anchor this muscle it helps to create a downwards pull on the PSIS or the Ischial tuberosity. As mentioned, this can be created by the gluteus maximus and or the hamstrings.
Note that you could do the opposite, lift and stabilize the backs of the ribs (by using the obliques). Anchoring the top end of the iliocostalis, you then pull upwards on the PSIS which then helps the psis and ischial tuberosity to resist being pulled downwards. Thus the iliocostalis can help to anchor the gluteus maximus and/or the hamstrings.
Reducing stress on the lumbar spine
One very interesting way in which the iliocostalis can be used (as well as the longissimus) is to reduce the load on the lumbar spine.
Bending forwards while standing, you could use the muscles that run up the spine to help keep the spine reasonably straight. You'd then be using the deeper muscles of the spine, the spinalis (which I haven't talked about in this article) plus possibly the portions of the longissimus which attach at their upper ends to the thoracic vertebrae. The sensation when doing so is of strong activation along the back of the spine.
However, if you use the iliocostalis to pull caudally (away from the head) on the backs of the ribs, then you are passing the weight of the ribcage, via these muscles, to the hip bones and from there to the gluteus maximus and or the hamstrings.
When creating a downward pull on the backs of the ribs, via the iliocostalis and longissimus say, the front of the ribs can lift. However, this lifting action can be resisted by the obliques, the external obliques in particular, along with the external intercostals.
Why might you want this to happen?
If you use the obliques to resist the iliocostalis and longissimus, those two muscles can activate with greater force and thus create greater sensation. You'll thus get a better feel for your back. So when lifting the ribs and bending the spine backwards you'll want the obliques to activate. This not only gives better sensation, it also helps to stabilize the ribs and the thoracic spine. If you can then vary the output of the muscles, you can then fine tune your posture, making it more comfortable, or going deeper or both.
If you have back pain, then activation of these muscles can help you detect where you posture is uneven left to right. A lack of sensation can tell you that muscles on one side or the other aren't activating. You can then begin work to figure out why those muscles aren't activating, or simply get to work on getting them to activate.
This mindset also applies to all of the other muscles talked about in the context of the lower back. By learning to activate these muscles, you can also get a better feel for the various parts of your lower back. A good starting point for dealing with low back pain is to look for in-balances, differences between the sides.
Because the same things that provide sensation are the same thing that stabilize and move the elements of your back relative to each other, by learning to feel the anatomy of your lower back you develop your ability to both diagnose and fix problems, assuming that they are muscular in nature.
Note that, you should make sure that you have anchored your longissimus by adding tension to the long dorsal sacroiliac ligament.
Sliding the ribcage
When lifting the fronts of your ribs (and pulling down on the backs of the ribs) you might choose to translate your ribcage forwards relative to your pelvis. This can be accompanied by tilting the pelvis forwards.
You could also do the opposite. Slide or translater your ribcage rearwards and allow your pelvis to tilt back. (And actually, you could slide your ribcage back and allow the weight of your upper body to press down through the sacrum causing your pelvis to tilt back and your lower back to flatten.) In this case you can accentuate lifting the backs of your ribs (so that your back feels open) while pulling down on the fronts of your ribs.
In either case you can exert the iliocostalis and longissimus against the external obliques and perhaps also the rectus abdominis.
You can further accentuate activation by also activating your transverse abdominis, using it to create an inwards pull on the front and sides of your waist.
Body basics
To get a better feel for your own body, as well as learning how to do things like feel and move your spine, hip bones, hip joints, and even your shoulders, as well as improving control of your transverse abdominis, check out the body basics program.
This is a collection of exercises that you can do while standing and in some cases while sitting to improve both control and awareness of your body. The exercises are simple and explained with follow along videos.
Because they are simple, you can practice them anywhere. And the focus is not just on "doing exercises", but on feeling your body as you learn to better control it.
These exercises by themselves may not help you eliminate back pain. However, they'll give you most of the tools you need for working towards a pain free back.
Likewise, if your goal is more effective use of your body, these exercises help you to directly experience a lot of the muscles talked about in this article.
And if all you want is a deeper experience of your body, then these exercises are a good place to start: body basics
Published: 2020 01 05
Updated: 2023 03 22
