Arm Stability Via the Elbows and Hands
For Handstand, Chaturanga and Other "Arm Supported" Yoga Poses
For general shoulder and arm stability, especially when the arms aren't bearing any weight I like to work from the ribcage outwards.
- First stabilize the ribcage,
- then stabilize the scapulae relative to the ribcage,
- and then let the arms take care of themselves.
An alternative for working on arm stability when the hands are on the floor and bearing some or all of our body weight (such as in downward facing dog, handstand, plank, chaturanga dandasana etc.) is to start from the hands upwards.
That can mean stiffening the fingers, or as I prefer, pressing them into the floor to stabilize hand and wrist, and squeezing the elbow to stabilize the elbow joint and prevent or at least restrict upper arm rotation.
Where in the first case the intent was to create stability by fixing the shoulder blade to the ribcage, in this instance it's created by fixing the arm bones relative to the floor or ground.
Stabilizing the forearm to anchor the rotator cuff muscles
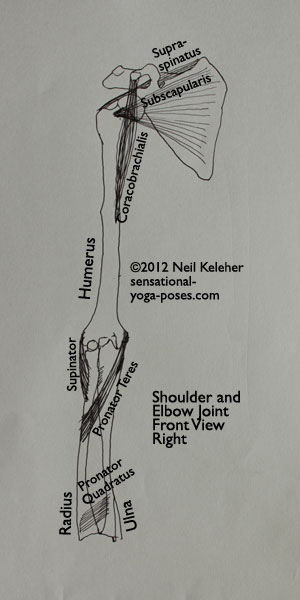
The shoulder could be modeled as having two joints. There's the connection of the arm to the shoulder blade. At this connection the arm bone (humerus) can swing and rotate at the shoulder joint. Then there is the connection between the shoulder blade and ribcage. The shoulder blade can slide relative to the ribcage and rotate.
Working from the ribcage outwards we can stabilize the ribcage then stabilize the shoulder blade relative to the ribcage so that the arm bone (the humerus) has a stable foundation.
Working from the hands inwards towards the body, we can stabilize the forearms (wrists and elbows) so that the humerus has a stable foundation. With the forearm fixed, we limit the rotational ability of the humerus. Because of this the rotator cuff muscles don't have to stabilize for rotation. Instead they can be used to focus on pulling the arm bone into the shoulder socket creating shoulder stability.
The cool thing about stabilizing wrist and elbows is that you may not even have to worry about consciously stabilizing the rotator cuff. (If you did, one way you could do it is by "sucking" the arm bone into the shoulder socket.) The rotator cuff muscles might just take care of themselves.
Controlling Forearm Rotation for Arm Stability
With your hands on the floor, or even with one hand on a table top, you may have noticed that even with the hand fixed in place (by the table top or floor or other surface) you can still rotate the forearm so that the elbow either points out to the side or backwards. By stabilizing the wrist and the elbow you help to limit this rotational ability and that is what helps to create shoulder stability in poses like handstand.
Even with elbows bent, such as in chaturanga dandasana, you may find that "squeezing" the elbows is helpful.
Some Elbow Joint Anatomy
I started exploring elbow joint anatomy because of a non-active triceps head which may have contributed to uneven development between my two shoulders.
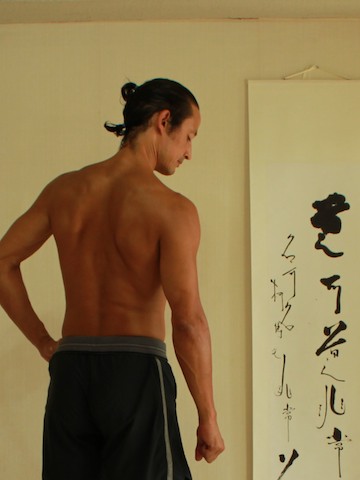
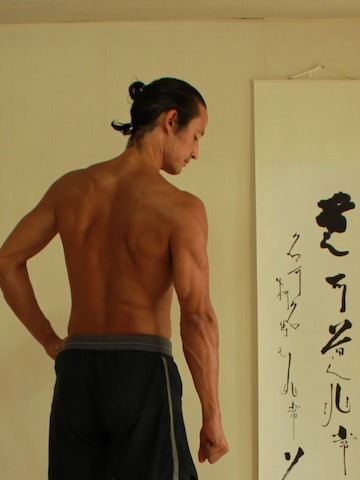
To overcome this issue I practice engaging the medial head of the triceps on both arms. Then I practiced engaging the lateral head of the triceps as well.
(In the first picture, triceps are relaxed. In the second picture they are engaged.)
I found that by engaging triceps and brachialis together I could make the elbow feel strong whether straight or bent. (I did this by "squeezing" just above the elbow joint, both at the back of the arm and the front.) The trick was in learning to consciously use the triceps and brachialis against each other.
Bending and Straightening the Elbow Joint
Focusing only on single joint muscles that cross the elbow joint (so that it's easier to understand and to isolate from the shoulder joint):
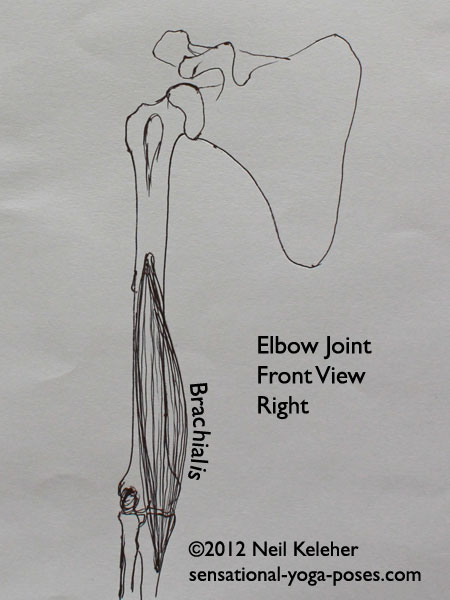
- the Brachialis is a single joint muscle that crosses the front of the elbow. It attaches the upper arm bone to the ulna.
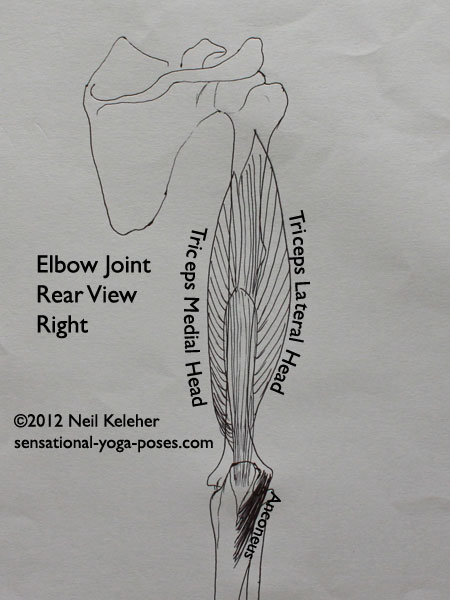
- The lateral and medial heads of the Triceps, cross the back of the elbow to attach to the ulna.
- The anconeus is a much smaller muscle but with a similar action. Together these muscles can be used to straighten the elbow.
Used against each other these two sets of muscle can be used to stabilize the ulna with respect to the humerus, whether the elbow is straight or bent.
Activating the Single Joint Muscles of the Elbow
With elbow straight, squeeze or engage the muscles at the back of the upper arm. This is to engage the triceps. But to avoid activating the long head of the triceps (which acts on the shoulder joint and the elbow) keep the back of the shoulder relaxed.
If you squeeze just below the back of the elbow you'll also be activating anconeus.
Also engage the muscles at the front of the arm just above the elbow as if trying to bend the elbow. The two sets of muscles then work against each other to make the elbow stable.
Another way to activate both sets of muscles simultaneously is to focus on making the elbow feel straight. Then make it feel straighter. Once the elbow is straight you can't make it straighter, but you can continue to add tension to the front and back of the elbow to give a sensation of making the elbow feel straighter.
Try the same thing with elbow joint partially bent. Make the front and back of the elbow feel strong. But focus the "strength" to the area around the elbow joint.
Then try the same thing while varying the muscle tension so that your elbows "turn." It's actually not your elbows turning, but your upper arm and forearms. But the turning movement can be generated by muscles that cross the front of the elbow and attach to the radius. (The triceps, anconeus and brachialis all attach from the humerus to the ulna.)
For myself, after practicing with each arm individually I then focused on engaging both elbows and making the muscles of both arms feel the same, particularly the triceps medial and triceps lateral head.
The Bones of the Forearm
The ulna is one of two bones that make up the forearm. At the elbow it forms the point of the elbow and at the wrist it ends on the pinky side of the hand.
The radius is the other bone that makes up the forearm.
Where the ulna is bigger at the elbow end, getting thinner at the wrist, the radius is bigger at the wrist joint, (and smaller near the elbow.)
With the hand free the radius rotates around the ulna to create forearm rotation so that the palm can face up or down. With the hands held in place the ulna rotates around the radius so that the elbow appears to rotate.
Supinating and Pronating (Externally and Internally Rotating) the Forearm
So what about controlling rotation of the forearm since that's what helps create arm stability? First of all some more terminology.
Supination, or external rotation is turning your forearm so that your palm faces in the opposite direction to your elbow.
Pronation or internal rotation is turning your forearm so that palm faces in the same direction as the point of your elbow.
Supination rolls your thumb outwards (or rotates the forearm so that the thumb side of the hand rolls outwards.) Pronation does the opposite.
Pronators and Supinators
The supinator muscle of the forearm is called "supinator". The pronators are pronator teres and pronator quadratus.
The pronator teres and supinator are both located close to the elbow joint. Because of this proximity you may find that you these muscles also activate when you activate brachialis and triceps. Activate all of these muscles by "squeezing" the elbow (but while keeping the elbow fixed in place.)
For myself, when I first practiced "squeezing" my elbows, I found it very easy to do strong or muscular rotational movements of my forearm. Then I found that I could relax my pronators and supinator and focus just on stabilizing ulna relative to humerus so that my forearms could still rotate, but more freely, more loosely.
(The difference between strong or muscular rotational movements of the forearms and "loose" rotations are like the difference between moving the head of a camera tripod when the lock is slightly engaged as opposed to being completely disengaged.)
For arm stability use the pronators and supinator against each other to control or restrict arm rotation. With the hands on the floor this not only prevents the forearm from rotating, it prevents the upper arm from rotating as well and that's what creates shoulder stability from the ground up. (It keeps the point of the elbow pointing in a fixed direction.)
To fine tune your elbow control try adjusting the region of squeeze. See if you can vary or move the tension around your elbow joint until you find the squeeze that stabilizes the elbow in rotation or in bending movements or both.
Squeezing the Elbows for Shoulder Stability in Down Dog and Handstand
A good way to practice arm stability via the elbows is in downward dog with only some weight on your hands. (To reduce the weight, put your knees on the floor.) Squeeze your elbows and rotate them inwards and outwards. You could think of this as creating shoulder stability at the "arm end" of the shoulders or from the arm inwards.
Then, while you are squeezing your elbows and rotating your arms notice how your shoulders feel. Notice how your shoulder blades move relative to your ribcage.
Fix the elbows when you find a shoulder position that feels comfortable.
Once you've got the hang of it then practice gripping the floor. Press your fingers into the floor to create stability at your hands and wrists.
A recommended sequence of actions would be to tense the fingers first, then squeeze the elbows.
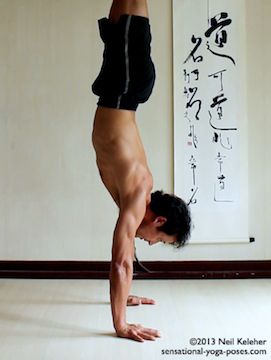
Once you've got a feel for this in down dog with knees on the floor, try it with knees straight, and if you are doing handstand see if you can duplicate the feeling in handstand. Prior to going up, press your fingers into the floor, then squeeze your elbows. Then move up into handstand.
You may find that your handstand feels more stable.
Plank and Chaturanga Dandasana
If you've done yoga push ups (a potential substitute or preparation for chaturanga dandasana) you could use that exercise to practice squeezing your elbows. Instead of pushing your hands forwards and down, focus on squeezing your elbows instead.
Another possibility is to practice the action with elbows straight in cat pose and then in cat pose with knees lifted to add more weight. Then try it in plank. Then see if you can keep the action while lowering down from plank into chaturanga dandasana.
Once you've gotten the hand or creating arm stability by squeezing your elbows, then try the reverse and stabilize your ribcage first and then your shoulder blades. See which one works best for you.
As you get more and more practice using your elbows to create arm stability you may find that your body will choose to do it automatically. You'll have engraved it in your motor control center so that you don't have to think about. You can then focus on being aware of what is happening.
Published: 2012 08 01
Updated: 2023 03 24

