L Shaped Handstand Against A Wall
Getting your center of gravity over your hands, instead of your hips and shoulders
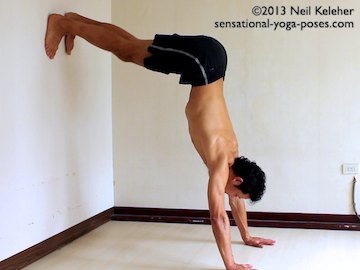
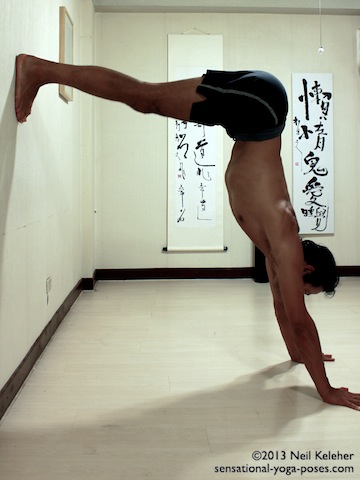
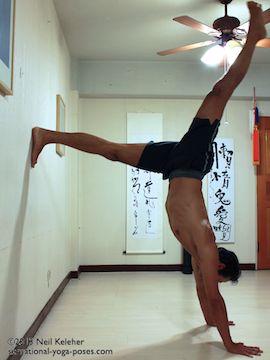
A lot of teachers use L-shaped handstand to teach "correct" shoulder, hand and hip alignment. They work at getting you to stack your hips, shoulders and wrists vertically even though your legs are horizontal.
I'd suggest a more "sensible" way to use this pose is to practice using your hands to feel where your center of gravity is. Do make your elbows and wrists active. Do may your shoulder girdle active. Do engage your core, and even your hips, knees and feet. But rather than stacking your hips, shoulders and wrists, instead work to position your center of gravity over your hands.
I talk about how in the text below.
How your center of gravity shifts when doing an L-shaped hanstand
When doing an L shaped handstand (as opposed to a legs vertical handstand) your center of balance shifts to a point somewhere between your knees and your pelvis.
\If you try to stack pelvis, shoulders and hands in a handstand with your legs horizontal, you won't be balanced because your center of gravity will not be over your foundation. It will instead be just in front of your hands.
This actually makes L shaped handstand harder to do than ordinary handstand, just because you aren't balanced.
How to actually balance in L-shaped handstand (or work towards balance)
If you actually wanted to balance in this type of handstand you may have to position your hands closer to the wall. Then you can move your shoulders, ribcage and pelvis away from the wall, until the point when your center of gravity is over your hands.
If you used your legs to slowly push your pelvis and ribcage away from the wall while at the same time "feeling" the floor with your hands, you'd notice a change of pressure in your hands. As you move your body forwards, the pressure will move forwards through your hands, towards your finger tips.
The place of greatest pressure tells you what point of your hands your center of gravity is over.
For easiest balance, I'd suggest positioning your weight over the roots of your fingers.
So that you can find this position easily, without overshooting it (in which case you'd fall over) work at pushing your pelvis and ribcage away from the wall slowly.
Also do this smoothly.
And so that you can get used to doing this gradually, simply push forwards a little bit, then go back, then go forwards a little bit more until you find the balance point. Notice your feet also. They'll get lighter as you move closer to balancing.
And if you don't find it straight away, don't worry, you are still gaining experience in l shaped handstand!
Perhaps what's more important in the beginning is using this version of handstand just to get used to being upside down.
And prior to that you can get used to using your shoulders.
Downward Dog
But before we do that we are going to do downward dog. Why? Because it is very similiar to doing L-shaped handstand. Particularly if you do it the way I recommend here.
Start in childs pose with your hands on the floor shoulder width apart. Spread your fingers. Lift your hips and position your knees under your hips with your arms forwards (hands still on the floor.) This is the finishing position.
Move your body forwards. As you inhale push your hips back. Use your shoulders to push your ribcage away from your hands. Expand your ribcage to lengthen your spine and push your pelvis even further back.
As you exhale let your body come forwards.
Repeat this a few times and then do the same thing but while keeping your knees lifted. As you inhale push your pelvis back while keeping your knees bent. As you exhale go forwards.
The idea of these two variations of downward dog are to get your used to having weight on your hands and also to get you used to using your shoulders to push your ribcage and pelvis away from your hands. For more details on this read downward dog or check out the videos on that page.
The next step is to do the same thing but with your feet on a wall.
But First, a note on safety
Make sure that you use a wall clear of obstacles and that the area around you is clear in case you need to exit the pose quickly. (The dog or cat can sleep somewhere else.)
L Shaped Handstand Part 1
So you've got a piece of wall. If you really want to, use your legs to measure how far to be away from the wall. Or just guess. Try to be close enough that you can get your feet up the wall while keeping your hands on the floor, like you are doing downward dog but with your feet on the wall.
Place your hands on the floor shoulder width apart with your elbows straight. Lengthen your neck. With your feet on the floor,
- Straighten your elbows
- Lenghten your neck.
- Lift your hips as high as possible and place one foot on the wall at hip height.
- Press that foot into the wall to push your pelvis away from the wall.
- Lift your other foot a little off of the wall
- Bring both feet down.
Rest for a breath and then repeat but leading with the other foot.
If you are too far away from the wall to do this move close. If you feel you are too close to the wall move away from it.
The idea of this exercise is to get used to being upside down and to get used to doing L-shaped handstand in stages. It's also to practice using just one foot to press your pelvis away from the wall. If you push with the one foot you can then easily lift the other foot off of the floor.
L Shaped Handstand Part 2
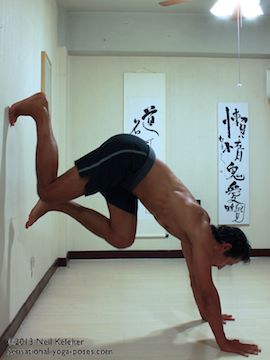
The next part of doing L shaped handstand is pretty similiar to the first part except now you bring your feet together on the wall.
- Make sure elbows are straight
- Lengthen your neck and open your chest
- Lift pelvis high and place one foot on the wall at hip height.
- Press your foot into the wall, but keep the knee bent.
- Lift and place your other foot on the wall next to it keeping both knees bent
- Bring both feet down one at a time.
Rest for a breath if you need to and then repeat but leading with the other leg.
Try to do each step with a smooth rhythm.
For the next step you are going to practice pushing your hips forwards, away from the wall.
Step 3 L Shaped Handstand, Pushing away from the wall
Do the steps as before. This time, hold for a few breaths with both feet on the wall. Use your legs to push your pelvis away from the wall. Do this slowly. You might want to start this one with your hands further away from the wall so that there is no danger of pushing your pelvis so far away from the wall that you tip over. As you get more comfortable, do it with your hands closer to the wall. Remember, you don't have to have your knees straight in this pose.
Using your hands
As you push your hips away from the wall use your hands to feel where your center of gravity is. If your hands are close enough to the wall you should be able to push your hips far enough forwards that you can get your center of gravity over your hands. If you go too far forwards you center of gravity will end up behind your hands and you'll fall away from the wall. So move slowly. See if you can get your center of gravity over the base of your finger tips. Then move your center of gravity back towards the wall. Rest when you need to.
Practicing the Kick in L Shaped Handstand
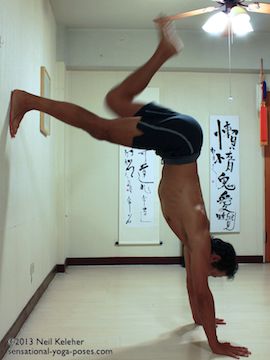
For the final L shaped handstand exercise, you can position one foot on the wall, press your hips away from the wall and then smoothly reach your other leg straight up. To avoid the danger of falling over, start this exercise with your hands further away from the wall, especially if you don't have a spotter.
As you get used to the exercise and as you get used to using your hands to feel where your center of gravity is, practice reaching your free leg upwards while pushing away from the wall with your leg at the same time. You'll be using a similiar action to kick up into handstand.
Breathing In L-Shaped Handstand
Once you are used to L shaped handstand, practice holding it and breathing in the pose.
When you inhale use your shoulder to push your ribcage up, away from the floor. At the same time open and expand your ribcage and lengthen your waist. Push your pelvis up to the ceiling.
Relax these actions while exhaling
Creating Length in L-Shaped Handstand
This last exercise is to practice creating length in your body while upside down. This may help make balancing easier (even though you aren't balancing) because by focusing on lenghtening your body you may add enough tension to unify all of the different centers of gravity of your body making it easier to keep your body balanced. But prior to actually balancing it helps to create the length (and stability) first.
You can practice this in down dog first, and then in l shaped handstand with your feet against the wall. While in either pose, as you exhale make your fingers and arms feel long. Don't just straighten them focus on making them feel longer. Relax the length while exhaling. (To Make your upper arms feel long reach your elbows away from your shoulders.)
Then do the same thing with your spine. Open your ribs and lengthen from head to tail. Then do the same with your legs.
To make your thighs feel long reach your knees away from your pelvis. Practice the parts individually if you need to and then try to add them together, inhaling and lengthenign your whole body and then exhaling and relaxing.
Do this first in down dog and then try it with your feet on the wall. So that you don't push your self over while in L shaped handstand, make sure that your hands are far enough away from the wall!
Published: 2011 10 11
