Standing upright
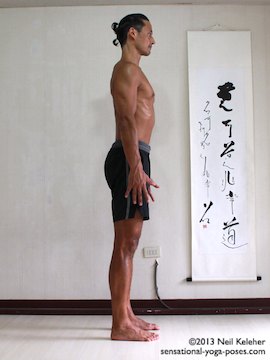
The Sanskrit words Tada and asana mean respectively mountain and pose or posture and so this pose is also referred to as mountain pose. Generally it is done with the arms by the sides with the elbows straight. Palms can face inwards, or forwards or even outwards for slightly different effects on the shoulders and chest.
Sometimes Tadasana is done with the hands placed in prayer position in front of the heart. This variation of mountain pose is sometimes referred to as pranamanasana. Pranam means to give respect to someone.
One other common name for this pose is samasthiti where sama means same, equal or upright and sthiti means stand. And so another way to think of this pose is rather simply as standing upright.
Tadasana Basics
To stand in Tadasana, stand with your feet together and knees straight. You can stand with your big toes touching but if your ankle bones get in the way you may have to separate your heels slightly.
Optionally, you could stand with your heels together and your feet slightly turned out.
If you find that your lower back is uncomfortable, and you intend on spending more than a few breaths in mountain pose, you could choose to stand with your feet hip or shoulder distance apart and your knees comfortably bent.
Draw your head back and up so that the back of your neck feels long and so that your chest lifts a comfortable amount. This should cause your shoulders to move back. At the same time, it can cause your arms to rotate outwards slightly.
Straighten your elbows and position your palms facing inwards.
Gently lengthen your fingers and thumbs and spread them apart so that you can feel your fingers and the palm of each hand.
Controlling your Breath via Pubococcygeus activation
If you have difficulty controlling your breath, or if you find that whenever you focus on your breathing it's difficult to take slow inhales or exhales, try pulling upwards on the floor of your pelvis.
If that doesn't make sense, try drawing the bottom tip of your tailbone slightly towards your pubic bone without allowing your pelvis to move. (You'll be activating the pubococcygeus, which is part of the pelvic floor musculature). See if you can notice a change in sensation at the floor of your pelvis as you do this. To get a better sense for this, try turning the sensation on and off a few times, working towards slowly activating and relaxing. From there, pull inwards on your lower belly and on the sides of your waist.
Try activating these actions prior to the beginning of each inhale. Release them when you exhale. Ideally these help to anchor the muscles that you breathe with making it easier to control both your inhales and your exhales.
Tadasana Benefits
Improve stillness and help quiet your mind
One way to practice Tadasana is to focus on standing absolutely still. This requires extreme presence. You have to focus on feeling your body and noticing any change in sensations, slight muscle activations, changes in muscle tension, changes in pressure sensation at your feet that indicate that your body is about to move or shift. By noticing these changes early enough you can make the necessary adjustments to stop these movements before they begin. As a result, this particular method of doing Tadasana can be useful for quieting a busy mind, practicing concentration and for improving body awareness. As well as keeping the body still, it helps to keep the eyes still and focused on a single point.
Improve Balance
If you focus on the sensation of pressure between your feet and the ground, and notice how it shifts, or work to consciously control it, you can also use mountain pose to help you improve your balance. To further challenge your balance and your control of your center of gravity, you could deliberately shift your center so that your forefeet and toes press down with pressure and so that your heels only lightly touch the ground. If you can keep your weight centered over your forefeet and toes, you can not only help improve balance, and your control of your center of gravity, you can also help strengthen the muscles of your feet and ankles.
Improve posture from the inside
While one suggestion is to try to stand absolutely still in mountain pose, you don't have to. One way to use mountain pose, or even to approach moving towards stillness is to practice moving in the pose. As an example you can practice moving your ribcage and head with small, slow, smooth and even rhythmic movements to help improve awareness of those parts. You can then learn to feel when your chest is lifted, just enough that your cervical spine is vertical with your head balanced on top. This is a wordy way of saying it can help you to improve your posture. But rather than simply holding your chest up and your head back, the idea is to use mountain pose to get a feel for your posture so that you can hold good posture with awareness, comfortably and with minimal muscular effort.
Notice left right imbalances
Another way in which you can use mountain pose, particularly if you scan your body, focusing your awareness on clearly defined elements, is to help notice left right imbalances. For example, do you tend to stand with your weight more on one leg? Is one rotated externally compared to the other? Do your hips tend to push to the right or left or turn to the right or left? Does your ribcage tend to turn to one side or does one side tend to be more lifted or depressed than the other? Do you hold your head evenly? Your shoulders?
All of these are imbalances that you can spot while moving your awareness through your body in mountain pose. If you spot imbalances, you can work, say from the ground up, to adjust your mountain pose to eliminate or at the very least minimize these imbalances.
If that's not possible due to muscle control habits that require deeper work, then you can also use mountain pose to recognize when particular imbalances have been corrected.
As a side note, asymmetrical standing postures or standing asanas are a great way to further explore left right imbalances.
Practicing micro adjustments
Another way in which you can use mountain pose is to practice micro-adjustments.
Micro-adjustments are the equivalent of tuning an old-style radio. Initially you turn the dial to the radio station you desire, but then you move the dial back and forwards, sometimes more than a few times to find the position where reception is clearest. This can be more prevalent when listening to the radio while driving.
With micro-adjustments, the idea is to adjust the body part in question with small back and forward movements to reduce excessive tension but to add tension where there is none. It can also be use to adjust muscle activation sensation.
And it can be used to find the comfortable position for the body part in question. It's a way of finding the best alignment from within, fine-tuning it based on feel rather than solely by external appearance, where external appearance is the equivalent of turning the dial to, say, 1050 on your AM dial or 104 on your FM dial. (Q107 anybody?)
Practicing meditation
Another way in which you can use mountain pose, or a variation of it (feet hip distance, knees comfortably bent) is to meditate.
If you are new to practicing yoga, you could use mountain pose to mentally warm up your body or mentally warm up to your body. In this case you can think of it as a foundational pose that you can use prior to practicing other standing yoga postures.
Flat feet, arch control and shin rotation
If you have flat feet, or collapsed arches, one way to work on alleviating the problem is to practice shin rotations. But if you haven't got either of these ailments, you can use shin rotation to help improve foot control. In either case, this is yet another action that you can practice while in mountain pose.
To begin with, stand with your feet hip distance apart and knees slightly bent. Keeping your feet stationary, i.e. without shifting your feet relative to the ground, rotate your shins and knees inwards. The inner arch of your feet will flatten. Next, rotate your shins and knees out. The inner arch of your feet will lift.
Next, try the same actions with your knees straight.
With knees straight you can practice driving shin rotation with your hip muscles. Focus on rotating your thigh bones. Or you can drive it with the muscles that extend from the hip bone to the sides of your lower legs. Here focus on turning the tops of your lower leg bones, particularly the top of your tibias, the larger of the lower leg bones, but also the tops of your fibulas. You can also practice driving these movements with the muscles of your feet and ankles. In this instance, focus on flattening the arches of your feet and then lifting them.
As you get used to shin rotation you can adjust and then micro-adjust the amount of shin rotation you use. Find a position that is comfortable on your feet, knees and hips.
As mentioned, you can use shin rotation even if you haven't got collapsed arches of flat feet. In addition, you can use shin rotation in other yoga poses so that you can use your leg muscles more effectively.
Shoulder blade positioning
If you have poor shoulder awareness, or imbalanced shoulders, another action that you can practice in Tadasana mountain pose is deliberately moving your shoulder blades.
Prior to this, practice first lifting and lowering your sternum so that you have a feel for your ribcage. From there, work at keeping your ribcage still, with the sternum lifted, while protracting (moving your shoulder blades outwards) and retracting (moving them inwards, towards each other.)
You can also practice lifting them and depressing them.
When practicing any deliberate movements of your scapula (another name for shoulder blade), start with them relaxed. Think of this as a neutral position or home for your shoulders. Slowly move them forwards, then relax to return them home. Repeat this a few times while focusing on feeling and controlling your scapulae. Then do the same for the other movements.
Noticing how your ribcage posture affects your shoulders
Once you have a basic feel for your shoulder blades, you can then practice moving your chest, lifting and lowering your sternum say, and noticing the effect this has on your shoulder positioning relative to your ribcage.
Ideally what you can notice is that lifting your chest tends to move your shoulders back while lowering it, even sinking it down, will tend to cause your shoulders to slump forwards and inwards.
One reason for practice shoulder awareness and ribcage in relative isolation is so that you can, for example, lift your chest without using a strong retraction of your shoulder blades to help.
Another reason for focusing on moving the ribcage in isolation is that you can use it to improve control of your ribcage.
Making your spine feel long
One of the most basic actions that you can carry out in any yoga pose or asana, not just mountain pose, is to make your spine feel long. This is a simple way of working towards feeling and controlling all of your vertebral joints.
Lumbar and sacrum
You could focus on your lumbar spine initially. Try tilting your pelvis back slightly (or forwards if required) so that your lumbar spine feels comfortably long. To further accentuate lengthening your lumbar spine, try drawing your ribcage up, away from your hip bones.
From there, move your awareness downwards and try to make the back of your sacrum, the base of your spine, feel long also.
Thoracic
Then from there, move your awareness upwards. Adjust the lift of your sternum to try to make your thoracic spine feel long. Alternatively, if you have the necessary awareness and control, try creating an upwards pull on the backs of your ribs, either side of your thoracic spine.
Cervical
From there, draw your head back and up in a way that the back of your neck, your cervical spine, feels long also.
Counting your vertebrae
To develop even better spinal awareness you can practice spinal segmentation as you lengthen the parts of your spine. You don't need an external device or special equipment to do this. You can simply count vertebrae as you lengthen your spine one vertebral segment at a time.
If you haven't already learned to feel and control your spinal erectors and levator costarum, that can be a first step. But if you have already learned that control, then a simple process for spinal segmentation is to focus on the lumbar spine, the lower ribcage, the upper ribcage and the cervical spine independently.
Vertebral landmarks
First learn some basic landmarks that you can use as references for counting vertebrae.
For the top of your neck, draw a line through your ear holes. The top of your neck is just slightly lower than this line. For bottom of your neck, feel the bump at the base of the back of your neck.
For the upper and lower ribcage, feel the bottom tip of your shoulder blades. For women, the height of your bra strap can be a good initial reference. Another rough reference is the bottom of your sternum, though the dividing line between upper and lower ribcage may actually be a little bit lower.
For the bottom of your ribcage, simply feel with your hands the bottom ribs, and in particular where they join your spine. For the bottom of your lumbar spine, feel the rear point (the PSIC) of
the crest of each hip bone, just where it meets the lumbar spine. Note, that the top of your sacrum and the bottom of your lumbar spine is actually a little bit lower than this.
Starting from the top, you could focus on lengthening your cervical spine one vertebrae at a time. Since there are seven cervical vertebrae, count to seven as you work your way down. You should end up at the base of your neck. If you end up too high, or more likely, too low, then repeat the process until at the end you reach the base of your neck.
Repeat the process for your upper ribcage, which also has seven vertebrae. This corresponds to the seven true ribs, the ribs that attach directly to your sternum.
For your lower ribcage the count is five vertebrae, corresponding to the false ribs, the three ribs that attach via cartilage to the sternum, and the two floating ribs.
For your lumbar spine, the count is also five.
The foundation of a pose and its expression
Getting back to the idea of mountain pose as a foundational yoga pose, one other simple way of conceptualizing mountain pose in a way that can be applied to all other yoga poses (shivasana may be the exception) is in terms of rooting or sinking downwards while at the same time expanding upwards and outwards.
Our center of gravity tends to be positioned between our hip bones, though it can shift depending on what we are doing. The horizontal plane through our center of gravity can be the datum or reference. Anything below this plane, our hips and legs, is, in general our foundation and this is the part of our body that is stable and grounded, if you like reaching downwards into the earth. Meanwhile, everything above this is what reaches upwards and outwards, expressing the pose.
Another way to put it is that our legs, up to our hip bones and sacrum is our foundation in Tadasana. Meanwhile our spine, and everything above the sacrum, but also including it, is our expression. Here then, our center of gravity and our sacrum could serve as the connecting center for the rooting and expanding parts of our pose depending on what we are focusing on.
Note, some mental flexibility is required when thinking in terms of foundation and expression. As an example, while in mountain pose, say with your feet hip width and your knees slightly bent, you could shift your weight to one foot. Then your foundation is the standing leg, the leg bearing all of your weight, up to that hip bone and your center of gravity. The other leg, not bearing any weight, then becomes part of the expression of the pose.
A more general concept that you can apply to any pose is the idea of having some part of your body acting as a foundation while the remainder, if not relaxed to the point of flaccidness, is reaching upwards or outwards or both, thus expressing the pose.
These two points could be thought of as basic principles that you can apply to any active yoga pose and indeed, basic principles that you can apply to doing anything.
Emptiness, a lack of sensation and a lack of control
In the same vein as above, one other concept that can be important is the idea of emptiness. This can be deliberate emptiness, but it can also be emptiness, a lack of both grounding and expansion, that we are unaware of.
In terms of sensation, there is muscle tissue activation sensation, connective tissue sensation, skin touch sensation and point of contact pressure sensation. These are all sensations that we can use to feel our body. And since muscle activation sensation and connective tissue sensation are both the result of muscle activation, these sensations are derived from and lead to the ability to control our body.
Emptiness is an indication that we lack control of the part of the body in question. It is both a lack of sensation and a lack of control.
Shivasana, choosing to be empty
While we generally don't practice it when doing yoga poses, it is important to understand this concept of emtpiness, and be able to use it. It's the rough equivalent of the numerical concept of zero. And if mountain pose is often used at the beginning of any yoga practice, then this zero can be encapsulated in the ending pose on any yoga practice, shivasana.
Where with tadasana and other poses we can ground downwards from our center and extend upwards and outwards from it, with shivasana we can focus on simply relaxing and sinking down into the earth. It's still control, or rather, it's still choice, but now instead of choosing to feel and control, we choose to relax.
Now instead of our foundation being within ourselves, we allow ourselves to be supported from without, by the earth itself.
Clavicle and Scapulae positioning and control in mountain pose
For your arms in tadasana, after lengthening lifting your chest or lengthening your spine, you can try moving the bottom tip of your shoulder blades outwards while at the same time drawing the top peak of the shoulder blades, the accromion process, rearwards. The feeling is as if you are trying to tuck the points of your shoulder blades into your armpits.
For collar bone control, you can try adding a slight amount of collar bone compression while preventing the accromion processes from moving. While it may sound and even feel like you are trying to compress your collar bones into the sterno-clavicular joint, where they connect to the sternum, the intent is actually to activate, or help increase the activation of the clavicular portion of the pectoralis major.
The feeling of compression is actually this muscle, clavicular pectoralis major, helping to pull the humerus and clavicle towards each other. This action may also activate the anterior head of the deltoid muscle, which has a similar line of attachment and a similar function.
This action can help create rotational stabilization of the humerus relative to the collar bone and shoulder blade.
If this activation does not feel appropriate for you, then leave it out.
Fine tuning shoulder rotation and arm positioning in mountain
With your shoulder girdle stabilized, smoothly point your elbows back. Your upper arms will rotate outward as a result (assuming they were rotated inwards to begin with). You can vary the amount with micro-adjusting to change how open the front of your shoulder joints feel. Correspondingly, you can also adjust for the amount of activation along the back of your shoulder joints.
Rather than just straightening your elbows, make them feel strong as you straighten them. You'll get tension in the biceps brachialis muscles along the front of the upper arm and the triceps along the back of your upper arm. You may also find that your upper forearm muscles become toned.
From there spread and lengthen your fingers and turn your forearms so that your palms face inwards. Alternatively, with your elbows continuing to point to the rear, turn your palms forwards or rearwards.
With respect to your legs, you could try first activating your pelvic floor muscles as mentioned above. From there, also engage your lower belly and the sides of your waist. You could choose to then lengthen your spine.
From there, to activate your hips, try exerting a slight rearwards push on either side of your pubic bone. You should notice some gluteus maximus activation as a result. This is one way of activating the deep hip muscles and using them to stabilize the hip joint while at the same time centering it. You can try one side at a time and once you get hip sensation, you can adjust it by moving your pubic bone slightly left or right, or by rotating the target leg slightly inwards or outwards.
Published: 2023 03 23


