Mountains are Solid and Effortless
Mountains sink downwards.
They are dense, immobile, heavy, stable, made up of the same stuff as the bones of the earth.
Their mass is pulled down by gravity.
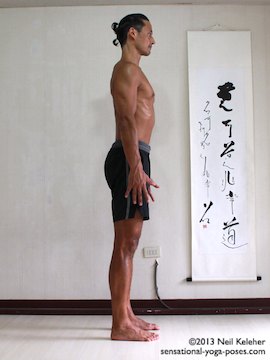
You can evoke a similar feeling of solidness while doing mountain pose by feeling your body and by responding to what you feel.
You can focus on aligning your bones and joints with gravity so that your bones bear the weight of your body.
Your muscles can then relax then relax to the point where all they do is nudge your bones back into alignment when they fall out of alignment. In general, what you can look for are areas of excess tension.
This is a sign or indication that you aren't aligned with gravity.
As a result your muscles have to contract in order to maintain your position.
To start of with you'll have to use your muscles to pull your bones into alignment.
It's a lot like building a building.
You use large cranes to move the elements of a building into place, then as the building becomes self supporting you don't kneed the heavy equipment.
And ideally, as you change positions, at each step of the transition you maintain the self supporting quality of the pose so that you never have to bring in the heavy equipment.
Unless you are lifting something heavy...
And so that you can learn to feel and get familiar with your "lifting equipment", (your muscles) the idea is to activate them and relax them, repeatedly.
At The Base of Mountain Pose
For starters, you can begin mountain pose by standing with your feet about hip width apart, with your feet aligned beneath your hip joints (or each hip joint positioned over their respective feet.)
You can stand with your knees slightly/comfortably bent, your spine upright and your arms hanging down freely by your sides.
As you practice mountain pose you can gradually straighten your knees as you get more and more used to aligning each part of yourself with gravity.
You can also work towards doing mountain pose with feet together. However, you don't have to rush towards this. I spent months (even years) doing my own variation of mountain pose with knees bent and feet apart.
It's only recently that I've found that I am now more comfortable doing it with knees straight.
Weight Shifting
to Improve Balance Awareness and Proprioception
Rather than trying to stay still in mountain pose right from the get go, I'd like to suggest you practice moving in mountain pose so that you get a better feel for your body (thus improving proprioception). A simple and mindful movement you can do is to rock back and forwards so that you shift your center of gravity backwards and forwards while doing so.
As you rock backwards and forwards focus on feeling the changes in sensation that occur in your feet and ankles. As you make your actions smoother and slower move through the three positions below.
Weight on Heels
The first position is with your center of gravity just over the fronts of your heels.
If you have your center of gravity over your heels... actually, just slightly ahead of your heels, then you can balance on your heels with the fronts of your feet touching the floor.
Because your weight is on your heels and not balanced between your forefoot and your heels, your feet can relax.
Weight Centered
Lean forwards slightly so that your weight is even between the fronts of your feet and your heels.
Spin you shins outwards so that the front of your shins and knees both point in the same direction as your toes.
Feel the outer edges of your feet to press down into the floor.
At the same time, pull up slightly on the center of your outer arch.
Then press down through the base of your big toes so that you shape your inner arch also.
Try to do both actions with the smallest amount of effort possible.
Read Foot Exercises for a more thorough description.
Weight Forwards
Rock forwards even further so that your weight is centered between toes and forefeet.
Weight Shifting Choices
Try weight shifting from your heels to midway between heels and forefoot. Then rock back and repeat.
Another option is to start with weight midway between heels and forefeet and then rock forwards so that your weight is even between toes and forefeet. Then rock back and repeat.
Another choice is to rock forwards just enough so that your toes begin to press down. Then rock back just enough that your toes relax.
Rolling Your Shins and Activating Your Feet
Another exercise you can do while in mountain pose is to start with the shins rolled inwards. Your arches will probably collapse. Slowly roll your shins outwards just enough that your arches lift and your knees point in the same direction as your toes. Relax and repeat.
As you roll the shins out try to press down through the inner edge of the forefoot. Press down through the base of the big toe. You can also try pulling down on the fibula, the smaller of the two shin bones. Relax both actions when you roll the shins in.
What you may notice is that as you roll the shins outwards the outer edges of each foot press down into the ground. As you roll the shins inwards they lift.
Also notice any sensations in the knee. Ideally you can find a position where the knees feel comfortable.
I often find that when standing on both feet it feels better to allow the outer edges of the feet to lift a little.
When balancing on one foot, that is when I find it more helpful to have the outer edge of the foot pressing into the floor. additionally, when standing on one foot I find balance can also be made easier if my weight is slightly forwards so that the toes press down.
Stabilize the Heels
For a long while in mountain pose and other standing yoga poses I focused simply on shin rotation and shaping the arches of the feet as my primary method of foot activation. What I now also focus on is stabilizing the heel bone. Generally I focus on feeling the heel bone and using muscular action to turn the heels outwards relative to the shins.
The feeling I get is a "pulling up" sensation on either side of each heel bone.
You may not be able to feel or do this action straight away, however, as your yoga practice progresses, you may find this action is helpful, particularly if you have leg/hip stability problems.
Aligning Your Legs with Gravity
Now just because your center of gravity is over your heels, that doesn't mean that your legs are necessarily vertical. This next exercise is designed to help you be aware of when your legs are vertical (or not.)
Stand sideways in front of the mirror so that you can see the greater trochanter of your thigh bone (the bump of bone just below the hip crest).
For easier visualization, place one finger on this bony protrusion and then move your hips forwards or backwards so that this point is over your ankle.
Position your hip joints over your ankles while keeping your center of gravity over your heels (just forwards slightly) and notice the new position of your spine.
To get used to this positioning, try moving your hips back and forwards with respect to your feet (your ribcage will tilt forwards and back at the same time) and see if you can feel when your legs are vertical. You may notice a slight feeling of relaxation or release in the lower back when you find this position.
Try this with your knees slightly bent and then with them straight.
Note that this adjustment isn't crucial.
You may find that it is enough to focus on your feet, and then your spine while doing mountain pose.
Straightening Your Spine and Verticalizing It
With respect to the spine, I'm going to suggest that for mountain pose you try to straighten it.
This is not a recommendation for you to keep your spine straight at all times, but so that you can feel when it is straight and thus maximally long.
Once you have your spine straight you can play with relaxing some of the straightness so that your spine resumes its "normal" curves. Play around with standing in mountain pose with a straight spine and a neutral spine. Notice which one feels the best for you. Use which ever one feels best for you at the time. (And this may change from one day to the next.)
Playing with the Base of Your Spine
The pelvis forms the base of the spine. By controlling your pelvis you can control the amount of bend in your lumbar spine. You can also help to make this section of your vertebral column straight.
If you aren't used to "deliberately" controlling your pelvis, take the time now to slowly rock it backwards and forwards. This will probably be easier if you bend your knees slightly. Keep your knees pointing straight ahead as you do this so that your knees are the same distance apart as your feet. (And orient your feet so that your toes point straight ahead.)
Slowly rock your pelvis forwards so that your
- pubic bone drops and your
- tail bone lifts and your
- lumbar spine bends backwards (increasing the normal curve of your lumbar spine.)
Then tilt your pelvis backwards so that you lumbar spine straightens or even bends forwards a little or a lot. See if you can feel the position where it feels straight. Use a mirror to help you see when it is straight and then notice the feeling that accompanies this straightness. If you notice a position where your lower back feels comfortable, relaxed, open, you can use that as your marker for when your lumbar spine is straight.
Take some time now to see if you can straighten your lumbar spine, make your legs vertical and position your center of gravity over your feet so that your feet can relax.
Positioning Your Head, Ribcage and Neck
Our heads are quite heavy and as such their relationship to our ribcage can affect the alignment of the rest of our body.
Keep your head level from front to back and slowly pull your head back and up. Notice the back of your neck straightening as you do this. Move your head back and forwards slowly so that you can easily feel when your cervical spine is straight. Allow your chest to lift as you do this.
Next, focus on lifting your front ribs and straightening your thoracic spine as you lift your ribs. Rather than a forceful action, try moving your ribs and spine slowly so that you can find the minimum amount of effort necessary to straighten your spine. Now give your front ribs the same feeling that you had when you pulled your head back and up. Then pull your head back and up while the front of your ribcage is already lifted.
With your ribs lifted and your head pulled back you may get a feeling like you head is floating (wobbling) on the top of your neck. In this case you can think of it as being balanced on your neck and as a result the muscles that support your head on your neck can relax as much as they can because the bones of your neck are supporting your head. Meanwhile your thoracic spine is straight and if your lumbar spine is straight also then the weight of all of those components presses down on the pelvis in such a way that your pelvis can balance on top of your thigh bones.
Balancing Mountain Pose From Front to Back
Ideally, with these small adjustments you align your body in such a way that more of your muscles can relax easier. Do you feel more relaxed?
What if you have your legs vertical at the same time? And if you have center positioned over your heels? How does this all feel?
Ideally, it makes you feel comfortable and relaxed. And the only effort you used was mental effort. You took the time to practice sensing your body and control it and put it in a position where your bones are aligned with gravity.
If you are having trouble with this, try making your adjustments slower and smoother. Try to make the actions of your mind slower and smoother also.
Now, if your knees are still bent, try slowly to straighten them and see if you can find the same feeling of relaxedness.
(And for now, if you are wondering about your arms, see if you can let them hang down from your shoulders and relax.)
Balancing Your Mountain Pose from Left to Right
If you are aware of your feet while doing mountain pose, one of the things that you can do with this awareness is become aware of how your weight is distributed from left to right. You may find this easier to do if you move your body slightly and slowly. Shift your body so that your weight presses evenly through both feet. Also try shifting your body so that your weight presses down in exactly the same way through each foot so that each foot feels the same.
Starting from your feet you can scan your body while in mountain pose so that your entire body is as balanced as possible from left to right.
- Shift your weight left or right and try to get your weight even on both feet. Try to make the pressure through each foot the same and try to make each foot feel the same.
- Do the same with your knees. Make them feel the same, feel the front, sides and back of each knee. You may find that simply by focusing your awareness, they even out.
- Next notice your hip joints, where your thighs connect to your pelvis. Are they relaxed? Do they feel the same left and right?
- Notice your lumbar spine. Does each side of your lumbar spine feel the same?
- Notice your ribs, front, sides and back and left set and right set. Are they both the same?
- Next notice the bones of your neck.
- Finally, one other point to notice is the alignment of your jaw. If your teeth aren't aligned, when your jaw is closed your teeth may actually cause your jaw to misalign. So open your jaw slightly. Slide it left or right and try to feel the position where the center of your lower jaw aligns with the top of your mouth. Use a mirror to help.
As you get used to scanning your body, you'll notice imbalances. If you have the time, take the time to focus on those areas. Listen to your body, feel it, and see if you can gently feel it into balance.
Letting Your Arms Hang Down
If you can stand in mountain pose with your ribcage slightly lifted, open and at the same time relaxed, your ribcage will provide a foundation for your shoulder blades that should allow you to draw your shoulder blades to your ribcage with a minimum of effort.
Bear in mind that the way that your arms hang (or don't hang) from your shoulder blades also affects the way that your shoulder blades lay on your back.
Positioning Your Shoulder Blades and Elbows in Mountain Pose
To get used to positioning your shoulderblades, move your shoulders back and forwards. Do this slowly and practice feeling the inner edges of your shoulder blades as you do so.
Widen the inner edges of your shoulder blades away from each other so that your upper back feels open (so that the space between you shoulder blades and spine feels open.)
So that the front of your shoulders also feels open, roll your upper arms outwards so that your elbows point back.
Find a position where the front of your shoulders and back of your shoulders feel equally open and equally relaxed. At the same time lift your ribs enough that your thoracic spine can straighten easily and balance your head atop your spine.
Opening Your Hands
For the next part of adjusting your arms in mountain pose, open the bones of the palms of your hands, make your palms feel flat. Lengthen your fingers and spread them out. As with the shoulders, find a hand/finger positioning that makes your hand, fingers and wrists all feel open.
You may find that you can press your palm slightly forwards relative to your forearm to make your palm feel open and make your fingers spread "naturally."
Again check your thorax, head, neck and shoulders. Adjust your hands, and then relax the front and back of your upper arms and forearms.
Bend your knees, straighten your lower back, and then re-straighten your knees. Make your legs vertical, and then tilt your body forwards or backwards so that your center is over your heels.
Pull energy into your body by being aware, by taking in information.
Noticing what your senses are telling you, you become present.
Presence has weight, density, like a mountain.
Assembling a Mountain Pose
Stand balanced in mountain pose, and take the time to scan your body a few times. You don't have to do all of this in one session. Work at it gradually.
You can scan the following parts:
- your feet, knees (front, side and back) and hips,
- lower back (both sides), ribcage (both sides) and neck
- shoulders (front and back), elbows, hands, fingers
- forehead, eyes, cheeks, lips
- toes
As you scan, position each part so that your whole body can relax.
Part of relaxing can be smiling.
Published: 2011 01 16


