Yoga Notes
Notes from Teaching Yoga and Doing It

Some quick notes related to yoga.
Some quick notes related to yoga.
From the strength sensai on: how to train around pain.
This could be relevant if you are "married" to a movement practice like Asthanga, or to doing a certain pose.
If something hurts, change the way you do it. If that doesn't work, find a pose that is similiar but different enough that it doesn't cause you pain.
I'm usually pretty good at arranging things whenever I move homes. If a room doesn't feel right then I'll rearrange things until it does feel right.
And that's what learning a new yoga pose can be like. In a yoga pose the equivalent of furniture or books on a shelf are the bones and how they relate to each other. By shifting relationships slowly and mindfully we can find an arrangement that feels good.
Then every time we do the pose afterwards we can enjoy it while making small adjustments so that energy can freely flow.
Two of the primary things that I work on balancing are tension and space, both in my own yoga poses and those of people I am adjusting. These are the two opposites that we can work at feeling and adjusting so that the end result is yoga, a pose that we are present in now.
Some people have difficulty getting their heels to the floor in downward facing dog. One way to stretch the calves in this pose is to focus on lifting the fronts of the feet. I never used to think of it in this way, but it's actually an example of reciprocal inhibition. (Thanks to bandha yoga for pointing that out.)
What If you've got really tight calves and the above method doesn't help? If you have access to a gym then you can try this method of calf stretching recommended by the Strength Sensei. It's actually a prep exercise for people who can't get their butt to the floor when squatting.
What if you have tight knees (and, for example, can't put your butt on your heels when kneeling)? Then you may find that quadriceps stretching helps.
Here's a video I did a while ago on downward facing dog. The intent is to show you how to work towards the full version of the pose by breaking it down into elements.
Learn how to make the arms feel long first without weight and then with weight. Then also learn how to make the spine, including the neck, long.
The final element is learning to feel and control the legs and hips, making the legs feel long first with heels lifted and then with heels down.
For a more detailed written description read downward facing dog.

If you have shoulder problems but you still want to downward facing dog, I'd suggest modifying downward dog.
Gradually increase the work load on the shoulders by first doing downward dog with knees on the floor, then with knees lifted but bent. You could also try knees straight.
For each version of Down Dog, start with your shoulders over your wrists and then gradually push your ribcage and pelvis backwards.
In this way gradually add more weight to the arms.
I'd suggest making your arms, neck, thoracic spine and lumbar spine feel long. You can do this before you push backwards.
While in the pose pull your ears away from your shoulders and make your neck feel long. Push your finger tips into the floor. You can also try to create a slight feeling of tension at the front (palm side) and rear (back of the hand side) of each forearm.
You can then experiment and move the shoulder blades apart. Hold for a few breaths, then move them towards each other towards each other.
Notice how each position feels.
Then try rotating the upper arms outwards and then inwards.
(Try this with shoulder blades spread apart and drawn together.)
The purpose of all of these exercises is to notice how they make your shoulders feel. So rather than just doing the exercises, focus on feeling your body as you do them. Focus on feeling the part that are adjusting.
Then use the option that feels the best.
For now you may want to avoid bending the thoracic spine backwards.
Also avoid letting the body sag at the shoulders.
Instead try to create a single long line with the arms and spine from the hands to the tailbone.
Note that I do let my shoulders move down towards the floor in downward dog. But I do this as a stretch, as a preparation for wheel pose. And I work at creating length and space first. So rather than hanging down, I make the arms and spine feel long and I use the shoulders to push the ribcage back away from the hands. Then I move the arms upwards to bend the shoulders backwards.
Note I'll repeat this a maximum of three times within a single yoga session. If you are constantly moving in and out of downward dog then I'd suggest you may want to focus just on the lengthening aspect.
And, as mentioned, if you have shoulder impingement, I wouldn't recommend this at all until your shoulder gets better.
One final note, while making your arms and spine feel as long as possible in downward dog, try to relax at the same time. See if you can minimize the effort in doing the pose.

Someone asked about getting the weight even on both feet in Parsvottanasana.
So that you can feel your weight distribution in any standing pose (where both feet are on the floor) first of all practice shifting weight with feet about hip width. Shift from center to right to center to left to center.
Move slowly and focus on feeling your feet.
By moving to one foot then to both feet you should, from experience, be able to learn to feel when your weight is even on both feet. You can fine tune by noticing the way the front of each foot and heel presses down. Try to make both equal when standing on both feet with feet symmetrical.
In a pose like Parsvottansana it may be impossible to get the weight even between front and back foot. (And after the above exercise you may be able to feel this.)
But to equalize weight as much as possible, you'll probably have to sacrifice keeping the hips square to the front. In this pose that means pulling the back leg side of the pelvis backwards.
If you can get your torso to your front leg you may be able to get the weight even on both feet. If you can only get your chest as far down as horizontal then it will be more difficult.
Forgetting about getting weight even on both feet, my own current preference for this pose is to push forwards through the front leg and using that action to push the pelvis backwards while keeping the pelvis level and square to the front.
Then from there I reach the ribs and head forwards (and down) away from the pelvis. From there I adjust the "feel" of the back leg.
While I might not get equal weight on the back leg, I can get a similar feel between the legs by slightly rotating the rear leg outwards and activating the foot in such a way that the front of the foot and the back of the foot press down with similar pressure. Then I end up with both feet feeling similar but with the front foot having more pressure.

Someone asked me this question on youtube:
"I experience wrists pain after putting majority of body weight on hands. I have to add I have very mobile wrists. Is there any remedy to successfully do this pose or I should avoid any of handstands in the future?"
A few weeks after my response below, they got back to me to say that:
They had used most of my advice while doing tittibasana since it was easier to focus on their hands in that pose. And then they were able to do bakasana, a little wobbly, but they could do it.
Here's what I suggested:
First thing I'd suggest, make your fingers strong (press your fingers down into the floor.)
Second, also try "squeezing" your forearms.
Start in cat pose with weight back (like child's pose.) Slowly shift weight onto your hands (to add more weight press fronts of feet into floor and lift your knees a little.) As you shift weight onto your hands, gradually increase finger pressure and forearm squeezing pressure.
Slowly shift weight back and relax.
Repeat a few times.
As you repeat, adjust position of hands (turned out slightly or turned in) for maximum comfort.
Another action you can try adding is to separate your shoulder blades as you move your weight forwards.
You are going to have to self experiment, but the above is what I'd recommend.
Once you are comfortable in the above exercise you can try working towards bakasana, and then perhaps other inverted yoga poses. Take your time though.
One other suggestion that may help, try hanging from a chin-up bar. Try different grips, but hold while letting your body weight hang down. Focus on just using the strength of your hands.
These are top of the head suggestions. For exercise, try to smoothly move in and out of each position so that it is easier to maintain the actions that you are trying to do.
Here's the video for crow pose. You can also read more on crow pose.
Camel pose is a little bit like bow pose. Both have a similiar shape. The main difference is that in bow pose the belly is on the floor. In camel pose the shins are on the floor. You may find that some of the actions you use in bow pose can also be used in camel pose to make the pose feel more integrated.
Read more...

If you go to the youtube page for the video below you'll see that one commentary says that feeling the vertebrae is only really helpful for lazy people, or something to that affect.
In a way he is right. The way that I teach yoga is for lazy people. It's for people who want to expend the least energy possible whenever they do something.
I actually prefer to think of this as an intelligent approach.

In this video I go over a technique for improving vertebral awareness. This is part of how I increased spinal awareness to the point that now I can consciously activate (and relax) my psoas with greater ease.
And that in turn has led both to deeper twists but also a reduction in low back pain for myself.
It's not the final solution to back pain (one youtube viewer suggests that Indian clubs will help) but it may help you on that path towards a pain free lower back.
The better you can feel your body, the better you can use it.
If you have tense shoulders, it may be helpful to focus on the inner part of the ridge of the scapula as you lift and lower your shoulders. First pull your head back and up so that your neck is long.
Then concentrate on slowly pulling upwards on this part of the ridge so that you activate the middle fibers of the trapezius. Squeeze your trapezius muscle as you do so.
Then let your shoulder blades slide down your back. Focus on relaxing your trapezius. As you do so it might help to imagine your shoulder blades continually sinking or sliding down your back. Imagine them to be heavy and let the heaviness pull them down.
Repeat both actions slowly and smoothly, keeping your neck long and straight as you do so.

In this video I go over the basic steps I use to stretch the hamstrings in wide leg forward fold. The first set of actions are actually to develop hamstring strength and control while hamstrings are near or working towards maximum length.
The idea is that if you can consciously contract your hamstrings at maximum length or as you work towards it, your hamstrings will then feel safe enough so that you can relax them and stretch them.
Rather than holding any one position I often repeat a set of actions to help me go deeper. In the first instance those actions are:
Often while relaxing and letting the ribcage sink down I find that I can go a little bit lower each repetition.
Then I do the same actions but while keeping the hamstrings relaxed. And this is one other reason for first learning to deliberately activating the hamstrings. If you can deliberately activate them and feel them contracting then it is that much easier to also relax them and keep them relaxed while stretching them.
One important thing to get from the video, watch the speed with which I do the movements while I am in the stretch.
If you have any comments, or questions you can try using this facebook entry.
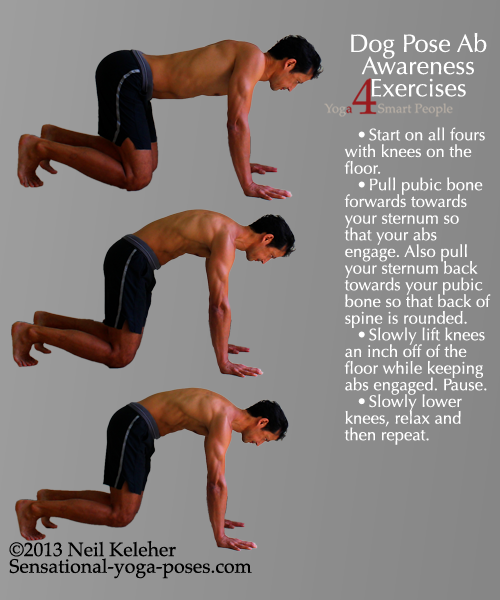
Ab awareness can be important in inverted yoga poses. But rather than learning to try to control your abs while inverted I'd suggest first learning to feel (and control) your abs in a pose like dog pose.
Dog pose is similiar to cat pose except that you lift the knees.
So that this turns into an ab awareness development exercise I like to use a sequential "by-the-numbers" approach. Each step is carried out distinctly with the focus being on the action in that step.
Starting on all fours with knees under the hips and arms under the shoulders and toes tucked under,
You only need to lift the knees a little in this exercise and for extra body awareness I'd suggest seeing if you can feel when your knees are just about to leave the floor. Then lift apply just enough force to lift your knees a tiny bit away from the floor. Try doing both of these steps slowly and smoothly.
You can either hold the final position for a number of breaths or slowly and smoothly move in and out of the final position.
An additionally step for shoulder awareness (and in particular to develop serratus anterior control) is to spread the shoulder blades first. Then engage the abs. Then lift the knees. Then reverse these steps to return to the start.
So that you can carry this same awareness into an inversion focus on feeling your abs as then engage and disengage. You can also focus on feeling your pubic bone, sternum, lumbar spine and ribcage.

One way to work on inner thigh strength and arm strength simultaneously is doing the half split one armed chaturanga.
With hands on the floor and elbows bent the first step is to lift the chest. This adds some load to the inner thigh so it helps if you lift your chest slowly and you activate the inner thigh muscles prior to lifting. With right leg straight, so that you can lift your right arm, engage your side abs (obliques) on the right side, and make your left arm strong. Then see if you can lift your right arm.
As you engage your leg, waist and supporting arm, focus on feeling your right arm relax. When it's relaxed (empty) then you can lift it.
Work at longer and longer holds and see if you can lift the arm and lower it smoothly. To rest just put your chest back on the floor.
(You can also try the same thing with elbows on the floor.)
Ideally this shows you how tension can be used to unify the body. The better you are at controlling tension (both creating it and relaxing it) the better equipped you are to control your body.
One way to create shoulder stability in inversions like handstands and other yoga poses where the arms bear some or all of the weight of your body is to "squeeze" the elbows.
If you "squeeze" or contract the muscles of the elbow you not only restrict the ability of the elbow to bend or straighten you can also limit the ability of the forearm to rotate.
With the hands on the floor this means that you can use the "elbow muscles" to control which direction the elbow points in. With arm rotation controlled by the elbow muscles (actually, the supinator and the pronator muscles) the shoulder muscles (such as those of the rotator cuff can focus on the task of sucking the arm bone into the shoulder socket and keeping it in place.
Read more on this technique in shoulder stability.
In yoga classes you may have been taught to stand up nice and tall with your spine long.
That's actually only one possibility for the spine. To better learn your spine and experience it, why not practice the slouch, the demi slouch and slouch zero (which is another way of saying no slouch at all.


The slouch can be a nice way to stretch the back of the spine. If you have low back pain, try to emphasize the lower back curve by tilting your pelvis backwards. Done while sitting this position (with abs relaxed) can also be a good way to practice or learn diaphragmatic breathing.
If you are finding breathing difficult try moving between the slouch and slouch zero. Move towards the slouch while exhaling. Move towards slouch zero while inhaling. You'll not only mobilize your spine you'll mobilize your ribcage as well.
As for the demi slouch, try moving from this position to slouch zero while keeping your shoulders relaxed. You may find your shoulders move forwards of their own accord when moving towards the demi slouch. And they move back when you move towards slouch zero.
To further practice shoulder mobility, try slouch zero with shoulders relaxed, shoulders forwards (serratus anterior active) and shoulders back (rhomboids active.)


Triang Mukhaikapada Paschimottanasana is a seated hamstring stretch where one leg is folded at the knee. The shin is folded to the outside of the thigh. It's one of the yoga poses in the Ashtanga Yoga Primary series.


One of the problems I see a lot of students having is keeping (or getting) the bent knee hip (the hero leg) to stay on the ground.
One option is to reach the hero leg arm forwards or to the sides to add weight to the pose. The added weight comes from keeping the arm lifted.
Another option is to use the ground for leverage. Initially this can come from using the straight leg arm to prop the body. Press outwards and down with the arm. Use the arm to help push your center of gravity over your hero leg so that you can sink the hip down. But then, try pressing down with your straight leg. Press down with your straight leg and then try to lift the straight leg arm and reach it forwards. Then put the arm back down again to rest your leg.
You may have to open your straight leg out to the side slightly to get the necessary leverage, but once you get the hang of using your straight leg, then move your foot inwards more.
As with the arm, using the downward pressure of your leg to help push your center of gravity over the hero leg. You'll strengthen the back of your straight leg and stretch the hip of your hero leg all at the same time. (And then you can grab a wrist easily beyond the front of your foot.)
In Rob Lucas's video he shows a hips low and hips high technique for jumping the legs through the arms with legs straight.
Of main importance is choosing where you look. For the hips low entry, look forwards. For the hips high entry, look down.
In Dice lida-Klein's video , he shows the same two methods for jumping into bakasana, keeping the hips low and jumping the hips high (and balancing in a hand stand variation) and lowering into bakasana with control. Note that Klein is jumping into elbows straight bakasana but you could probably do the same thing jumping into an elbows bent bakasana. Also I'm very jealous of how easily he can get his knees so high. (start at about 1:20 for the jump into bakasana)
One important thing to note is how he moves his feet far enough forwards in down dog that then he can then move his shoulders forwards past his hands prior to jumping. When Rob shows the hips high entry (at about .50) he balances with hips high. Here again if you look at the shoulders you'll notice that they are past his hands. However when Rob does the hips low entry his shoulders don't move forward past his hands.
I can't do karandavasana, but here is an instructional video (it's on youtube) from someone who can, Rob Lucas who teaches out of Red Door Yoga in Shanghai.
Now he suggests getting steady in pincha mayurasana first, and that does make sense. But I'd also suggest that the shoulder exercise he shows is a good way to get steady in pincha mayurasana.
(I use that same exercise to help get steadier and stronger in handstand.)
And a way to work towards that shoulder exercise is to do it first with knees and forearms on the ground. You can have your fingers interlaced like in the picture to the right, or palms flat on the floor the way the pincha mayurasana is normally taught.
In this position practice slowly move your shoulders forwards and backwards.
Once you can do this comfortably, then try the same exercise with feet lifted, on a wall perhaps as he shows in the video.
Then try it while doing the pose in front of a wall, far enough away that you can pull away from the wall, but not so far that you can't still use it to catch yourself it you fall towards it.
Initially you might want to bend your knees as you move your shoulders forwards. If you start of with legs straight and feet on the wall, then bending the knees as you move your shoulders forwards may help to keep your center over your foundation so that you stay balanced, or close to balanced as you move your shoulders forwards. Then straighten the legs as you move your shoulders back.
Better yet, move your legs (bend and then straighten your knees as required) so that the pose feels easy and comfortable as you move your shoulders forwards and back.

I got an email asking me why it's more difficult balancing with your eyes closed. The pose in question was tree pose but it applies to any balancing yoga pose (I think.) It's because we use our eyes to help us balance. At least most of us do.
And so one of the things that I have my students do is close their eyes while balancing. Half moon pose is my favorite pose for doing this in. But you can do it in any balancing pose. And so that it is safer and more comfortable I have my students close their eyes briefly and then open them again. And then I have them gradually increase the time they spend balancing (or trying to) with their eyes closed.
close your eyes... open
close your eyes........... open
close your eyes.................open
close your eyes......................crash.... open
Actually if you fall you can open your eyes before you hit the ground.
The interesting thing for me is that as I practice, sometimes I think I'm about to fall but I keep my eyes closed anyway, and I manage to save the pose.
An interesting side note. In half moon, I find that if I look up and close my eyes, this doesn't necessarily help my ability to balance in the same pose while looking down. So I practice doing the pose with eyes closed while "looking" down, straight ahead and up.
By the way, make sure that if you are doing this, you are practicing in an area where it is safe to fall.
I've included more on balancing (and feeling your body to make balancing easier) in balance basics.

Related: Yoga Pose Basics
How Far Should You Push Into Discomfort?
Using Yoga Poses to Learn Your Body
More Yoga Pose Basics articles

Mental models are created or modified whenever we learn. They drive habits, intuition and muscle memory.
This understanding can be the basis for reducing frustration and making learning, problem solving and doing easier.
Find out more about Learning how to learn-Mental models
Sensational Yoga Poses

Copyright©2010-2025 Neil Keleher.
All rights reserved.
Photos ©Neil Keleher,
All rights reserved.