Anatomy for Muscle Control
Improve muscle control, proprioception and understanding of your body
Why learn anatomy for muscle control?
So that you have a better idea of how and where to direct your sensing and controlling effort while learning to sense and control your muscles.
When doing yoga poses, anatomy for muscle control is helpful because it can help you decide where to squeeze or activate in order to help support you in the pose or take you deeper.
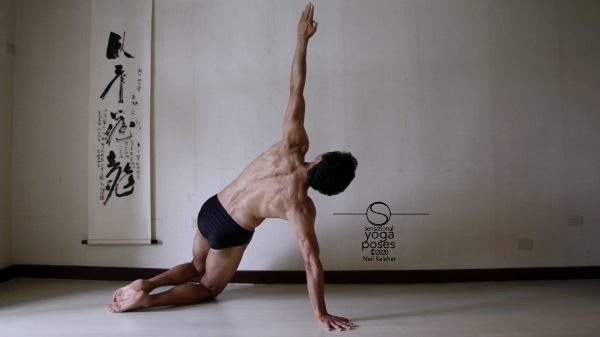
In the above variation of side plank, I'm deliberately moving the inner edge of my right shoulder blade away from my spine to activate serratus anterior. I'm also activating the muscles of the right side of my waist to slightly bend my spine to the right.
How muscles and joints work together
I tend to throw around the term "muscle control" quite a lot. For a deeper look at what this actually means (it includes "joint" control), read How muscles and joints work together. This is more than just saying "when a muscle activates it causes a joint to move in a particular way". Instead, it looks at an important quality of joints, their ability to reduce friction, and how this plays an extremely important role in reducing the load any single muscle has to bear. The result of muscles and joints working effectively together is that you can use the parts of the body together in such a way that no single part of the body is put under too much load.
This is the sort of understanding that you can use to guide the way you feel and control and use your muscles, working towards "effortless" effort. For all of that and more check out How muscles and joints work together.
Back bending anatomy for muscle control
When doing back bending yoga poses, you may want to activate the muscles at the back of the body in order to help bend the body backwards.
To bend backwards at the hips, you can use the gluteus maximus muscle, the hip extensors, and even the hamstrings (depending on whether the knee is straight or bent.)
To bend backwards at the knees you can use the hamstrings, the sartorius and a portion of the calf muscles (the gastrocnemius). To bend backwards at the lumbar spine, thoracic spine and cervical spine you can use the spinal erectors.
While back bending often (but not always) uses the muscles at the back of the body to help bend backwards, they also at the same time stretch the front of the body.
And so backbending at the hips stretches the hip flexors including the psoas muscle. Backbending (or bending back) at the knee stretches the quadriceps and the dual joint or "Long" hip flexor muscles.
Back bending the spine stretches the rectus abdominus and the intercostals at the front of the ribcage. Back bending the neck stretches the neck flexors.
I sometimes consider wheel pose a back bend for the shoulders. One way to stretch the shoulders in this way without doing wheel pose is with the puppy dog. Another way is with the Spiderman shoulder stretch.
A forward bend for the shoulders would then be any pose where the arms move down and back, like table top yoga pose or the Rack shoulder stretch.
Forward Bending anatomy for muscle control
When doing hamstring stretching yoga poses you may want to activate the muscles that act on the front of the body.
Bending forwards at the hips you can use the The Psoas and other hip flexors. You can't really bend the knee forwards, but you can straighten it, and for that you can use the quadriceps.
To bend the lumbar spine forwards you can use the abdominals, particularly the rectus abdominus but also the obliques. (These muscles, in combination with the intercostal muscles also help to bend the thoracic spine forwards.)
To bend the neck forwards you can use the neck flexors.
While bending forwards can exercise or use the muscles at the front of the body, front bends can also stretch the back of the body. Forward bending at the hips stretches the glutes and other hip extensors, including the hamstrings if the knees are straight.
Forward bending at the spine stretches the spinal erectors, the muscles that extend or bend the spine backwards. (This includes the muscles at the back of the neck, or the neck flexors.)
Side bending anatomy for muscle control
Like forward bending yoga poses and back bending yoga poses, side bends can happen at the hips and spine. It doesn't happen at the knees.
Side bending to the left stretches the muscles on the right side and vice versa.
Side bending the spine uses (and stretches) the obliques, intercostals and quadratus femoris. It may also use the psoas.
Side bending at the hip uses (and stretches) the gluteus medius and minimus. If you side bend the hips using standing side bend, with feet parallel and about hip width apart, one leg moves inwards (adducts) and the other moves outwards (abducts).
So in the first cast you stretch the outer hip muscles while strengthening the inner hip muscles. In the second case, the opposite occurs.
Spinal Twisting anatomy for muscle control
When doing twisting yoga poses, the twist might be passive or it may be active.
In active twists the abs, the intercostals, the spinal erectors and deep spinal muscles are used to drive the twist. These are muscles that act directly on the spine vertebrae (including the sacrum and coccyx), hips and ribs. You could also be using the hip muscles.
In passive twists you can be using your arms (and in some cases the legs) to drive the twist.
Even if twisting passively using the arms or legs, you would be wise to activate spinal muscles to help protect, and control the intervertebral joints.
this can be easier to do if you are using both arms and legs to drive the twist. As an example, in twisting/revolving triangle pose you can use the bottom arm against the strength of the legs to help drive the twist. So that you can use your arm, your spinal muscles will, of necessity, activate.
Note that doing a twist while sitting in a chair, and while gripping the back of the chair with one or both hands, you could get a similiar affect by pressing the feet outwards or inwards against the floor.
The idea in doing this is to cause your leg muscles to activate.
Providing stability for one end of a working muscle
When doing active or passive twisting, it helps a lot to anchor the muscles that are being worked on, whether those muscles are active or being stretched.
In a standing spinal twist, which is done with the torso upright, you can keep your hips square to the front or allow them to turn in the direction you are twisting your spine.
In either case you can turn your ribcage relative to your pelvis, and your head relative to your ribcage.
So that the muscles that twist the spine have a stable foundation, you can activate your hip muscles to stabilize your hip bones (the innominate bones) and the sacrum. From there, you can use your spinal erectors, abdominals and intercostals to turn the elements of the spine relative to each other
Creating Stability in Your Yoga Poses
Muscles don't just bend the body in different directions, then can also be used against each other (or against some external force) to stabilize the joints that they work across.
As an example, to stabilize the spine, the abs and spinal erectors can be used against each other.
Note that stabilizing a joint can happen at any position. You can stabilize the spine and keep it straight or you can stabilize it while it is bend forwards or backwards or to either side. And you can stabilize it while it is in a twisted position.
Likewise with the hips, shoulders, wrists, ankles and elbows.
Elements of Muscle control, the basics
For any muscle that you wish to get familiar with, learn the location of the belly of the muscle as well as the points of attachment of that muscle to bone.
- The muscle belly is important because use can learn to recognize when it is contracted and when it is relaxed.
- The points of attachment are important because you can learn to recognize pulling sensations at these points.
More than just being descriptions of muscles (or definitions) in an anatomy book, these are things that you can learn to feel and identify.
If you know where the belly of a particular muscle is with respect to other muscles in its neighborhood, in addition to points of attachment, you'll more likely be able to determine which muscle is activating and also choose which muscle to activate if you desire.
The Muscle Belly and Recognizing When It Is Active or Relaxed
The belly of the muscle is the part of the muscle that actually does the work. This is important because you can learn to feel when a particular muscle is working and when it is relaxed by focusing on the muscle belly.
The sensations it creates when it relaxes or activates are not only important for giving your feedback as to whether your body is responding as desired but also to help you fine tune your mental map of where the muscle belly actually is. The better your ability to know where each muscle is, the easier you will simply be able to put your awareness on that muscle and willingly contract it.
It's a little like driving a car. If you want to accelerate you put your mind and your foot on the accelerator and press down. If you want to slow down, then you put your foot on the brake pedal.
In the case of particular muscles, if you want to contact or relax them, assuming your body is in a position that allows them to do so, then simply put your mind on them and "squeeze" or "relax" as required.
Muscle control via points of attachment
Another important aspect of anatomy for muscle control is knowing the points of attachment of muscles.
In general, the belly of a muscle is attached to the bones that it works on via tendons.
(In some cases, the attachment points are via "ligaments" or via what is called an aponeurosis, which could be thought of as an array of tendons.)
If you know the points of attachment of a particular muscle you have another tool for more finely developing your body knowledge. You can use points of attachment to determine which muscle is activating or being stretched and also to help you actively contract a particular muscle if you desire.
To actively contract a particular muscle , you can focus on pulling or drawing the muscles points of attachment towards each other.
While stretching, and trying to relax, you can use the location of any pulling sensations to figure out which muscle is hindering you.
For example, when doing side to side splits or even half splits, I generally feel a pulling sensation on my inner knee, below the knee joint (so on the lower leg.) I feel a corresponding pull close to my pubic bone. I can thus infer that in this case it's my gracilis that is tightening up.
To help loosen it I can then try to deliberately contract it with greater force, and then relax it.
This is very much like releasing a ratchet, you have to pull it tighter so that you can then let it go.
If you try this yourself, make sure that you focus on slowly and smoothly contracting and slowly and smoothly relaxing. Also, practice this while your feet are fairly close together so that you have a better idea of what to expect as you move deeper.
If a muscle still won't release, then another option is to work at anchoring one of the end points of that muscle. In the case of the gracilis that could mean making the knee joint "stable" or "active". Or it could mean creating an upwards pull on the pubic bone (towards the fronts of the ribs).
Redefining Muscle Tissue and Muscle Actions
When learning to feel the muscles in your body, you may find it helpful to redefine (or define) muscles and muscle groups outside of "normal definitions" given in anatomy books.
Generally, you can refer to anatomy books to learn the whereabouts of a muscle belly, its points of attachment and its function. The names of muscles don't necessarily correspond to their function and sometimes muscles are grouped together because they share a location, or a common tendon, but they can have a different set of functions.
The way around this is to learn the names of muscles as a way of labeling and identifying them (and looking them up), but also feel free to create your own classifications based on where the muscle is and what it does.
A primary example of this is the gluteus maximus.
It has a deep portion that connects between the femur and the hip bone (and possibly the sacrum). It has a superficial portion that connects between the tibia and the hip bone (and possibly the sacrum).
In a similiar vein, be aware that even if, say, the hip joint is flexed, this doesn't necessarily mean that the hip flexors are active or that the hip extensors are relaxed.
And rather than saying a muscle has one function, be open to the idea that any single muscle can have multiple functions.
Developing a finely defined muscle naming nomenclature
If developing your own nomenclature for muscles, also be aware that it can also be used to name muscle fibers, or fascicles, separately.
Clearly defining fascicles of the external obliques
As an example you could break down the external oblique into fibers according to which rib they attach to and whether they attach to the pelvis or the connective tissue that wraps around the rectus abdominus.
Why do this?
So that if you are doing an active twist, using your obliques and intercostals to turn your ribs and ribcage relative to your pelvis, you can focus on activating the fibers that act on ribs 9 and 8, or on the 7th pair of ribs if you choose.
You might want to do this if one set of ribs feels "dead" in a pose. To wake up the muscles that act on those ribs, you can focus specifically on moving those ribs.
Creating differentiated gluteus maximus activation results
As another example, the glutues maximus, has attachments from the sacrum to the thigh bone. It also has attachments from the pelvis to the IT (illiotibial) band.
These groups of fibers have different lines of pull and if you can learn to distinguish them you can separate the functions of the gluteus maximus. You can learn to activate your butt muscle in such a way that your leg moves back or in such a way that it moves back and externally rotates.
The first step towards developing this control is understanding first that you can actually separate the two actions. (Like learning that a car has an accelerator, a brake and a steering wheel.) Then you can practice distinguishing the two actions. You then can go about experiencing your anatomy for muscle control so that you better understand it.
Muscle Belly In Relation to the Joint It Works On
While learning where the belly of a particular muscle is situated is important, another thing that you can learn or become cognizant of with respect to anatomy for muscle control is the position of a particular muscle belly with respect to the bones and joints that it works on.
As an example, the bellies of the various rotator cuff muscles (and other short shoulder rotator muscles) are located on the shoulder blade. These muscles all act on the shoulder joint.
The deltoid, biceps and triceps long head also act on the shoulder joint. However the bellies of these muscles are either on top of the shoulder joint or on the upper arm bone.
Then there are muscles like the pectoralis major and latissimus dorsai. These attach between the upper arm and the ribcage or spine.
If you consciously pull your shoulder joint towards your elbow joint and vice versa you can activate muscles that act on your shoulder and elbow.
If you instead squeeze your shoulder joint towards the inner edge of your shoulder blade, you can activate the aforementioned shoulder rotator muscles.
If you pull your upper arms towards your ribcage, while pushing your shoulder blades outwards, you can activate the pectoralis major and latissimus dorsai (and various other shoulder muscles also).
By understanding how a set of muscles and their muscle bellies relate to the joint that they work on you can more easily distinguish which muscles are active and which are not. You can also more easily control which muscles you are activating.
Experiencing and Understanding Your Body
Learning your anatomy for muscle control, and learning how to feel and control your body is an iterative process. You get better at it the more you do it. Eventually you'll reach a point where you can feel which muscles are activating and which aren't.
Or if you aren't sure but you want to know, you'll be able to break down what you are doing and have a good guess at what is activating.
By learning to feel and control your muscles to greater and greater degrees, you can use this understanding as a diagnostic tool to identify problem areas in either yourself or your students or clients. You could also use it to experiment. Try different muscle activations to see if one set of muscles can be used more effectively than another.
Another reason for getting to know your muscles is so that you can simply let them get on with their job as they are designed to do.
In this case you could treat your muscles like the employees of a company. The better you know your employees and what they are capable of doing, the better you can assign jobs or tasks, and then you can let them get on with it.
By becoming aware of your anatomy for muscle control you do a similar thing, you get to know your body as a whole. As a result, you can then learn to lead your entire body with a clear idea of what you are trying to do. Your muscles can then get on with doing it.
Published: 2011 02 26
Updated: 2023 03 23


